Creative use of shadows in photography — Photography podcast #26

This pho­tog­ra­phy pod­cast‚focuses on cre­ative shadow use‚and incor­po­rat­ing actual shad­ows into your pho­tog­ra­phy using the sun‚and other light sources.‚Thanks so much to Cindy and Al for their superkind com­ments (posted in our last pho­tog­ra­phy pod­cast #25) about our pod­cast­ing efforts. We LOVE com­ments and sug­ges­tions so please send more.

Links men­tioned in this pho­tog­ra­phy pod­cast:
‚- Ed‚Gordon and Peter Gordon’s work
‚- daronJ’s work on Flickr
‚- Bald Monk’s work on Flickr
‚- Photography.ca’s work (Marko Kulik — that’s me)‚on Flickr
‚- Flickr — Photo shar­ing web­site
‚- Google reader (great for orga­niz­ing pod­casts and blogs)

You can down­load this pho­tog­ra­phy pod­cast directly by click­ing the pre­ced­ing link or lis­ten to it almost imme­di­ately with the embed­ded player below this set of images.


Beach Kiss — Marko Kulik

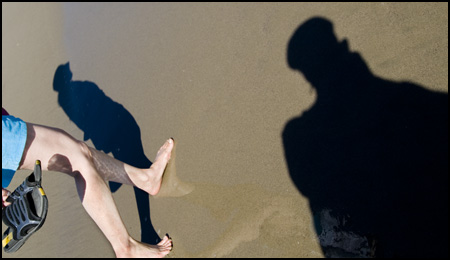
Beach Walk — Marko Kulik

Hold­ing My Own — Ed Gor­don

Heart Shadow by daronj — Tech­nique — Less com­pli­cated than I suggested‚in the pod­cast — Thanks for shar­ing daronj! — “I ended up using a sim­ple small hand held flash light at about a 45 degree angle from directly behind. That’s it.”

Rus­sia in the Spot­light — by Bald Monk

Basic photography tips

I met with long­time friend Mitch Joel this week and gave him a few basic pho­tog­ra­phy tips. It was such a plea­sure to finally share some of my knowl­edge with him. He’s been shar­ing his knowl­edge about‚digital marketing‚and the World Wide Web with me for YEARS. Although I share my knowl­edge freely with many peo­ple, with Mitch it’s been all take. Feels good to give (just a wee bit in comparison)‚back. By the way Mitch Joel has an AMAZING pod­cast and blog on dig­i­tal mar­ket­ing and I highly rec­om­mend it. He has a huge fan base and absolutely has the skinny on social media and dig­i­tal marketing.

Below are a few very basic pho­tog­ra­phy tips. Oth­ers may well be just start­ing off in pho­tog­ra­phy and these really brief and basic pho­tog­ra­phy tips‚might be‚helpful.

Expo­sure
——–
All cam­eras deter­mine expo­sure (the com­bi­na­tion of shut­ter speed and Aper­ture (size of the hole) ) by aver­ag­ing out the light in the scene. If it’s a scene with aver­age tones as most scenes are, the expo­sure should be cor­rect. If there is a pre­dom­i­nance of EITHER dark or light tones, the cam­era meter will prob­a­bly fail and the pho­tog­ra­pher must OVERRIDE the camera’s set­tings. The clas­sic exam­ple is the dude in front of the sun­set. The cam­era sees all that bright sky and cuts the expo­sure to aver­age out the scene and leaves the main sub­ject in near com­plete dark­ness. On the oppo­site end, a black‚car against a black wall — this will fool the cam­era as well, because the cam­era will try to aver­age out that scene and make the black‚car and black wall lighter. Rather than teach how to cor­rect for this (which is sim­ply to man­u­ally increase or decrease expo­sure) just be aware that scenes that have either too much dark or too much light in them are harder to deal with.

Com­po­si­tion
———–
Most peo­ple tak­ing a pic­ture of per­son will always place them in the dead cen­ter of the image. Take 1 shot, sure. Then place them off cen­ter and see how much more inter­est­ing the shot can become. This sce­nario works with every­thing. Art/photo his­to­ri­ans sug­gest that if you look at the scene through the viewfinder and divide it like a tic tac toe board, the most inter­est­ing place to place the main sub­ject is on the 4 CORNERS (top right, top left, cen­ter right, cen­ter left) of the cen­ter square BUT NOT IN THE CENTER OF THE CENTER SQUARE.

Red eye
——-
Red eye sucks and is some­times hard to get rid of with point and shoot cam­eras. WHENEVER pos­si­ble, mean­ing when there is a choice) don’t use flash. So if there is good ( good is dif­fused indi­rect and softer — bad is harsh direct shards of light) win­dow light, shut off the flash and use it.

Back­ground
———-
This one is sim­ple and makes a huge dif­fer­ence. Be aware of what is going on in the back­ground. Is it dirty, is there a coat-rack right behind the subject’s head? Move either your sub­ject, or you your­self move (when you can) to elim­i­nate dis­tract­ing backgrounds.

Hand hold­ing the cam­era
———————-
Most humans CAN NOT hand hold the cam­era at shut­ter speeds slower than 1/60th of a sec­ond (i.e. 1/30, 1/15 the of a sec­ond etc.) If you try to take a pic­ture and the result is blurry, it can eas­ily be a shut­ter speed issue.

Auto focus
———
Many point and shoot cam­eras have poor auto focus. The cam­era can’t know exactly what ele­ment in the scene you want to focus on. In this case, over­ride the cam­era and choose man­ual focus. If you are shoot­ing a por­trait, try to ALWAYS focus on the eyes.

Depth of field
————–
A huge topic but you should know some­thing about it. In a lens you can change the size of the hole or aper­ture to suit your needs. When the hole is large (mea­sured in F-stops F2.0, F 2.8, F4 etc) there is less sharp focus from fore­ground to back­ground. Great for por­traits where the main sub­ject stays sharp and the back­ground goes into soft focus.

When the hole is small (F16, F22, F32)‚ there is MORE sharp­ness from fore­ground to back­ground. Great for‚ land­scapes. The key is always to play. Take shots at dif­fer­ent set­tings and compare.

Shutter Speed in photography — Photography podcast #25

This pho­tog­ra­phy pod­cast talks about using shut­ter speed in pho­tog­ra­phy for cre­ative effects. When you want to pho­to­graph some­thing that is mov­ing, you the pho­tog­ra­pher should decide on the shut­ter speed. Don’t let the cam­era decide for you.

The dig­i­tal pho­tographs below were taken at Red Rock Cross­ing in Sedona Ari­zona (ya gotta go — it’s amaz­ing!). You can see that‚the long shut­ter speed (1 sec­ond) has a blur­ring paintery effect in the water, where the fast shut­ter speed (1/500)‚practically freezes the water. You can click the pho­tos to enlarge them.

Links men­tioned in this pho­tog­ra­phy pod­cast:
– Nice com­ment from Andre from Brazil

You can down­load this pho­tog­ra­phy pod­cast directly by click­ing the pre­ced­ing link or lis­ten to it almost imme­di­ately with the embed­ded player.


Shut­ter speed‚ — 1/500 of a second

Shut­ter speed — 1/30 of a second

Shut­ter speed — 1 second

Underexposure in digital photography — Photography podcast #24

This pho­tog­ra­phy pod­cast talks about DELIBERATE under­ex­po­sure in dig­i­tal pho­tog­ra­phy. Many new dig­i­tal cam­eras have a ten­dency to blow out the high­lights when the scene is too bright. Through judi­cious use of delib­er­ate under­ex­po­sure you can get back some of those blown out highlights.

The dig­i­tal pho­tographs below were taken at the Grand Canyon in Ari­zona. You can see that even though the 2 stop under­ex­posed image is way too dark when uncor­rected, I was able to pull out quite a nice pho­to­graph with excel­lent high­light detail. You can click the pho­tos to enlarge them.

You can down­load this pho­tog­ra­phy pod­cast directly by click­ing the pre­ced­ing link or lis­ten to it almost imme­di­ately with the embed­ded player.


Meter read­ing — uncorrected

1 stop under­ex­posed — uncorrected

2 stops under­ex­posed — uncorrected
Final photo from the 2 stop under­ex­posed image — color cor­rected with local dodg­ing and burning