SX-70 MANIPULATION Here’s what you will need:
Burnishing tools available at art supply stores. Or, use sharpened wooden dowels. Dental tools also work well. Use the gentle bends, not the sharp points as they can puncture or scratch the Mylar film covering. A camera capable of shooting Time-Zero film (A Polaroid 600 BE camera or OneStep camera can be adapted.) Time-Zero film Hair dryer (optional)
Steps:
1. Expose the film and put it onto a hard flat surface. Using the tools, apply different amounts of pressure as if you were painting over the picture. The effect is different during the various phases of development.
2. Apply light pressure with blunt instruments before you see the image come up. The effect is a general softening and blurring of the image.
3. Use a more pointed tool to outline areas and objects. For the next several minutes, the image is slightly visible. During this time, you can get white or black lines using different amounts of pressure. You can also create new colors in the image by applying slightly heavier pressure and mixing the layers underneath.
4. The next five minutes are for stretching and blending the image. Use a blunt or fine tip tool and lightly rub over the image areas you want to distort. Be patient and try different amounts of pressure. Try circular motions or short strokes. During the next 5 to 10 minutes, the image will begin to set. Use this time to blend the image areas.
You can freeze the print at any time after the image has fully developed to store and come back to later. Just warm up the print with a hair dryer and manipulate.
Optional Steps: Disassemble the developed film and peel off the Mylar from the backing. This contains the image. Wash the white developer off the Mylar to create a translucent image and overlay it onto another image. Use dyes and paints on the backside of the Mylar to intensify the effect.
If you don’t have an SX-70 camera, you can adapt your Polaroid 600 BE or OneStep camera to accept Time-Zero film.
Since they use different film speeds, place a 2-stop neutral density filter — available at a professional photography supplier — over the electric eye on the camera. This will compensate for the speed difference between 600 High Definition film and Time-Zero film.
One: Insert the cardboard “dark slide” from a spent pack of Time-Zero or 600 film into the film chamber of a Polaroid 600 BE or OneStep camera.
Two: Insert a new Time-Zero film cartridge on top of the cardboard. Be careful not to let the cardboard go into the camera.
Three: Remove the cardboard, leaving the Time-Zero cartridge in place and close the film door.
You are then ready to shoot Time-Zero film in your 600 camera!
This information was provided by Kodak– Inspiration, A Step-By-Step Guide.
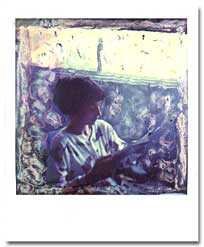
This Polaroid came out of my SX-70 camera. I used the cap of an ordinary ball-point pen to scratch this pattern directly onto the image.


