Conventional toning of photographs is done by soaking the actual photograph (printed on black and white silver based photo paper) in a toning solution. This toning solution can come in a multitude of shades, allowing for beautiful monochrome photographs. One of the most popular colours for toning is sepia. Sepia toning gives black and white photographs an antique light brownish look. It is made by several manufacturers but Kodak Sepia toner is the most popular (and the one we are referring to in this article). This product contains 2 parts: a bleaching solution and a toning solution.
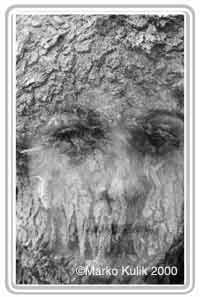
Black and white photograph
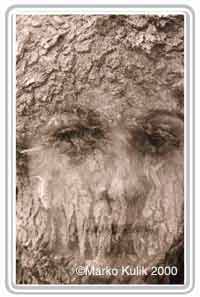
Same photo after being sepia toned
All you need to sepia tone one of your photographs is:
1) Kodak sepia toner-available at most professional photography stores.
2) An actual photograph printed on black and white paper. If you don’t have one, take an old black and white negative to a photo lab. Have them print a copy on black and white paper. Or shoot a roll of black and white film and have the lab print in on b&w paper.
3) Three Plastic trays( 12x15 inches to accommodate 11x14 inch paper, a standard size that’s not too expensive).Two of the plastic trays are for the toning solutions, the other is for rinsing the prints after each solution. It’s always best to wear rubber gloves when toning, especially if your skin is sensitive.
4)A well ventilated area in which to work which also has running water.
5) Two 1 liter containers to mix and store the chemicals.
6) Three tongs (obtained from most professional photo stores) used to manipulate the prints.
7)A squeegee to wipe the print clean and a place to hang the finished print to dry.
Please follow all directions that come with the Kodak Sepia Toner.
Kodak sepia toner comes in two parts. Part A is the bleach that you mix with water. Part B is the toner that you mix with water.
Basically though the drill goes like this. You will need to set up 3 trays. The first tray is for the bleach that you mixed, the second is for water, the third is for the toner that you mixed. It is the toner that gives the bleached print its brownish tone.
Just take a print, dunk it in the bleach, wash it, dunk it in the toner then wash it and dry it.…that’s it. Each photo will pass through the first three steps in under 10 minutes. It must then be washed (either alone or with other prints) for about 30 minutes.
Tip1: Bleaching time, print contrast and choice of paper determine how deep the sepia tones will be. Longer bleaching times mean deeper sepia tones.
Tip2: IN GENERAL — The toner works the most on the mid tones (grayish areas) of the photograph. It does not affect the black areas too much. It makes the highlights (white areas) go a bit whiter. That said, it is good practice to tone prints that have been printed bit flatter (have less contrast) than normal. The whitest tones in particular should be printed a bit darker ( 5–10% )to avoid washed out whites after the photograph is toned.


