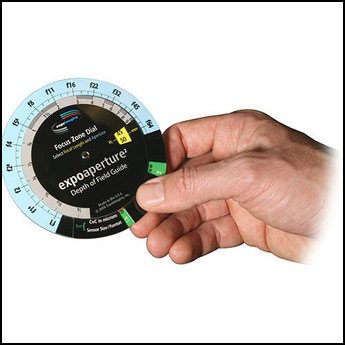
Photography podcast #70 discusses why sometimes our photographs do not appear sharp enough.‚ We touch on several important factors that all compromise image sharpness. For newbies in particular, we also mention the depth of field guide which clearly tells the photographer the zone of sharp focus (in feet and inches or centimeters and meters depending on the guide) to expect with a given aperture and lens.

Depth of field guide
Links /resources mentioned in this podcast:
Portable depth of field guide from B&H
Free depth of field table for most digital cameras
August’s‚ “Water”‚ assignment on the Photography.ca forum
If you are still lurking on our forum,
feel free to join our friendly ![]() Photography forum
Photography forum
Thanks as always to everyone that sent comments by email about our last podcast. Although ALL comments are appreciated, commenting directly in this blog is preferred. Thanks as well to all the new members of the bulletin board.
If you are looking at this material on any other site except Photography.ca — Please hop on over to the Photography.ca blog and podcast and get this and other photography info directly from the source. I Subscribe with iTunes I Subscribe via RSS feed I Subscribe with Google Reader I Subscribe for free to the Photography podcast — Photography.ca and get all the posts/podcasts by Email
You can download this photography podcast directly by clicking the preceding link or listen to it almost immediately with the embedded player below.
Podcast: Play in new window | Download


Todd5DII from our forum posted this on the forum so I thought I’d copy it here. Thanks Todd!
Just a few points that were not covered in the Sharpness Podcast
Remote trigger and Mirror Lockup
If shooting landscapes or fixed subjects use mirror lockup and remote trigger, this will eliminate a lot of vibration based softness
Tripods
Be sure to lock up the legs, head, and if long lens the attachment ring, I have seen a lot of new photog’s shoot “Loose” which is never a good idea (hey everyone gets tired of repositioning but which takes longer, doing it right, or going back and re-shooting?)
IS — Image stabilization, generally if tripod mounted turn it off, unless there is a lot of wind which makes the tripod “Vibrate” it will soften the image (try it sometime and see what I mean.
If handheld turn it on: Shoot in bursts (Linda Tharp suggested this, it does work if you are close to or below a shutter speed that is optimal, not sure why but I suspect the rapid shooting captures images between hand tremors, try it sometime!)
Lens Diffraction — DOF and Sharpness often work agains each other, just because your lens can go to F32 doesnt mean that’s where you should put every time. A good link to tell you how your lens performs in regards to sharpness at various F/Stops is http://www.slgear.com for instance http://www.slrgear.com/reviews/zprod…is/tloader.htm
Other Software Tips
There is software that can also help if you did everything else right.
DXO — Fixes lens aberations, can even make the canon 100–400 useable at 400mm f/32! Does require you to remember distance shot if using canon (damn you canon!) since they dont embeded focus info into EXIF
HeliconFocus — Blends multiple images with different focal points (works well when little or no movement expected)
Paitience
LOL, of light or some other factor is not critical remember wind does come and go in cycles, be paitent. Also you can up the ISO to 400 easily when nessecary on modern cameras, if you shoot the histo to the right a bit you can even do 800 with moderate noise processing to get pretty useable images these days
Todd
Marko –thanks so much for sharing this content rich, informative podcast with us! The information is great for newbies and more advanced practitioners of photography!
For me personally, the information was just what the doctor ordered!
Hi Marko –
Very nice podcast (as usual).
Regarding photographing birds in flight, I’d recommend someone starting out to practice on larger birds such as eagles, gulls, the larger herons and egrets, etc. They fly slower and less erratically.
A shutter speed of 1/1000 is a useful starting point.
One strategy that was recommended to me is to pre-focus on a certain point and then start tracking as the bird approaches that point. This is useful when there is a nest or favorite perch that you can anticipate the bird returning to.
I should add that I am far from being at the pro level, but I’ve been working on it for some time and benefited from advice from some of the best bird photographers.
For a challenge, try photographing swallows in flight; they are very fast, small, and their flight is erratic. I have yet to get a really good image with the bird in focus and taking up 80% of the frame.
If anyone can offer advice, I’d be more than appreciative.
Marko, just a note about sharpness, paople may also have focus sync problem, which can be called Back or Front focus, usually you cant see much on your viewfinder but sometimes the camera autofocus is not tack sharp calibrated so the lens will focus a bit before or after the subject and the result will be seen on the computer. Some cameras such as D300 (http://www.focustestchart.com/focus21.pdf) or 50D on Canon have the lens calibration option, so you can repir it yourself. Lower end cameras do not have this option because I suppose the manufacturers do not care specially because people will be usng kit lens.