I met with longtime friend Mitch Joel this week and gave him a few basic photography tips. It was such a pleasure to finally share some of my knowledge with him. He’s been sharing his knowledge about‚digital marketing‚and the World Wide Web with me for YEARS. Although I share my knowledge freely with many people, with Mitch it’s been all take. Feels good to give (just a wee bit in comparison)‚back. By the way Mitch Joel has an AMAZING podcast and blog on digital marketing and I highly recommend it. He has a huge fan base and absolutely has the skinny on social media and digital marketing.
Below are a few very basic photography tips. Others may well be just starting off in photography and these really brief and basic photography tips‚might be‚helpful.
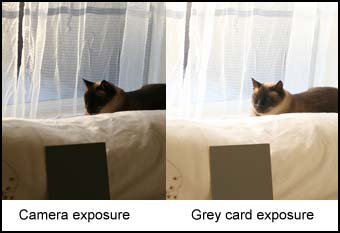
Exposure
——–
All cameras determine exposure (the combination of shutter speed and Aperture (size of the hole) ) by averaging out the light in the scene. If it’s a scene with average tones as most scenes are, the exposure should be correct. If there is a predominance of EITHER dark or light tones, the camera meter will probably fail and the photographer must OVERRIDE the camera’s settings. The classic example is the dude in front of the sunset. The camera sees all that bright sky and cuts the exposure to average out the scene and leaves the main subject in near complete darkness. On the opposite end, a black‚car against a black wall — this will fool the camera as well, because the camera will try to average out that scene and make the black‚car and black wall lighter. Rather than teach how to correct for this (which is simply to manually increase or decrease exposure) just be aware that scenes that have either too much dark or too much light in them are harder to deal with.
Composition
———–
Most people taking a picture of person will always place them in the dead center of the image. Take 1 shot, sure. Then place them off center and see how much more interesting the shot can become. This scenario works with everything. Art/photo historians suggest that if you look at the scene through the viewfinder and divide it like a tic tac toe board, the most interesting place to place the main subject is on the 4 CORNERS (top right, top left, center right, center left) of the center square BUT NOT IN THE CENTER OF THE CENTER SQUARE.
Red eye
——-
Red eye sucks and is sometimes hard to get rid of with point and shoot cameras. WHENEVER possible, meaning when there is a choice) don’t use flash. So if there is good ( good is diffused indirect and softer — bad is harsh direct shards of light) window light, shut off the flash and use it.
Background
———-
This one is simple and makes a huge difference. Be aware of what is going on in the background. Is it dirty, is there a coat-rack right behind the subject’s head? Move either your subject, or you yourself move (when you can) to eliminate distracting backgrounds.
Hand holding the camera
———————-
Most humans CAN NOT hand hold the camera at shutter speeds slower than 1/60th of a second (i.e. 1/30, 1/15 the of a second etc.) If you try to take a picture and the result is blurry, it can easily be a shutter speed issue.
Auto focus
———
Many point and shoot cameras have poor auto focus. The camera can’t know exactly what element in the scene you want to focus on. In this case, override the camera and choose manual focus. If you are shooting a portrait, try to ALWAYS focus on the eyes.
Depth of field
————–
A huge topic but you should know something about it. In a lens you can change the size of the hole or aperture to suit your needs. When the hole is large (measured in F-stops F2.0, F 2.8, F4 etc) there is less sharp focus from foreground to background. Great for portraits where the main subject stays sharp and the background goes into soft focus.
When the hole is small (F16, F22, F32)‚ there is MORE sharpness from foreground to background. Great for‚ landscapes. The key is always to play. Take shots at different settings and compare.