Loading

A Week With A View – a day anyway :)

A friend of mine, Chris Penn, sent me an email asking me to participate in A Week With a View whereby we choose one image a day on Flickr and blog about why we think it’s beautiful. I’ve got a nutty week ahead so I can only play today, but it ‘s a great idea and I encourage people to participate.

The photo I choose is called 0253 By Cia de Foto. Click the image to see it on flickr.

0253

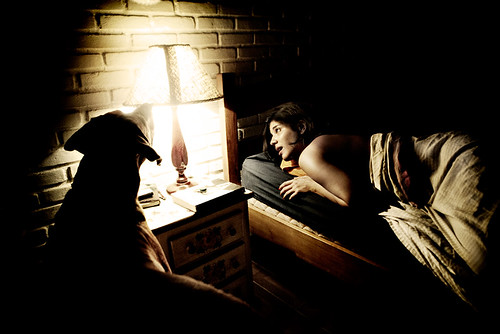
For me, part of what makes an image beautiful is some type of story or the suggestion of a story. In this image the light is on but the woman looks startled. Did the light go on by itself?‚ Did the dog turn it on? What IS going on here? It’s left up to us but we are definitely engaged.

Another thing that I find beautiful (Ok it’s a bit technical but it’s my post :) ) is how our eye is beautifully guided. We go from light to girl to dog and go back and forth between the lit elements. Our eye does not wander because the photographer is skillfully guiding us…..and for me, it’s a thing of beauty.

and if you don’t accept that, then the startled girl is beautiful.

68 – Creating a photography portfolio

Photography podcast #68 discusses how to to prepare a portfolio for clients, agencies galleries etc. Even though we are in the digital age, when it comes to presentation, nothing beats a beautifully printed photograph. This podcast shares some tips and tricks on putting together a great portfolio.

Links /resources mentioned in this podcast:
Presenting photography to galleries – Podcast #53
June’s low shooting angle assignment on the Photography.ca forum

If you are still lurking on our forum,
feel free to join our friendly :) Photography forum

Thanks as always to everyone that sent comments by email about our last podcast. Although ALL comments are appreciated, commenting directly in this blog is preferred. Thanks as well to all the new members of the bulletin board.

If you are looking at this material on any other site except Photography.ca – Please hop on over to the Photography.ca blog and podcast and get this and other photography info directly from the source. I Subscribe with iTunes I Subscribe via RSS feed I Subscribe with Google Reader I Subscribe for free to the Photography podcast – Photography.ca and get all the posts/podcasts by Email
You can download this photography podcast directly by clicking the preceding link or listen to it almost immediately with the embedded player below.

'Signing' your prints

When Picasso signed his paintings, he did so using his paintbrush and oils and generally placed his signature at the bottom right or left of his art pieces. So when ‘signing’ a photo that you are selling/giving away, what can be done as an artist to label your work?


A nice idea is to place a simple border around the photo, and have your signature and the photo’s title 1/8 of an inch below the photo. If not opting for a border, another idea would be to keep it ‘clean’ by placing a signature in the bottom right corner of the photo itself. Keep in mind though that you want to keep the photo clear and not have your signature or border disrupt elements in the photo.

Some photographers choose to sell their photos with mats already attached, and sometimes they sign the matting and not the image. This seems silly IMO; after all the photographer created the image not the matting so why sign the matting? Also, the matting can be separated from the print and so the signature or logo can get ‘lost’.

Some clients however prefer not to have a border/signature/title ‘disrupting’ their photo. In cases as such, you may want to confirm with your client first prior to printing. As an alternate way to sign your prints, a stamp with your logo/signature on the back of the print may be a nice final touch.

For more info, feel free to check out the link on our photography forum.

‘Signing’ your prints

When Picasso signed his paintings, he did so using his paintbrush and oils and generally placed his signature at the bottom right or left of his art pieces. So when ‘signing’ a photo that you are selling/giving away, what can be done as an artist to label your work?


A nice idea is to place a simple border around the photo, and have your signature and the photo’s title 1/8 of an inch below the photo. If not opting for a border, another idea would be to keep it ‘clean’ by placing a signature in the bottom right corner of the photo itself. Keep in mind though that‚you want to keep the photo clear and not have your signature or border disrupt elements in the photo.

Some photographers choose to sell their photos with mats already attached, and sometimes they sign the matting and not the image. This seems silly IMO; after all the photographer created the image not the matting so why sign the matting? Also, the matting can be separated from the print and so the signature or logo can get ‘lost’.

Some clients however prefer not to have a border/signature/title ‘disrupting’ their photo. In cases as such, you may want to confirm with your client first prior to printing. As an alternate way to sign your prints, a stamp with your logo/signature on the back of the print may be a nice final touch.

For more info, feel free to check out the link on our photography forum.

Photography.ca winning member images from May 2009

For the past few months we have added a new feature on our photography bulletin board where the Admin on Photography.ca (Me, Marko), chooses 1 photo that he thinks is great and talks about the photo. This month I teetered hard between 2 images and in the end decided that they were both winners. Wood Duck by Michaelaw and Navy ‘LST 325′ by z-06-jim were my choices for this month. (check the previous link for the explanation).

We have lots of photographs being submitted each month on our forum for critiques, assignments or just to show the photo. Choosing Michaelaw’s and z-06-jim’s photo as the ‹”winnersž took many hours of careful sifting. Given that it took so long to choose, I came across many close contenders. Seems like a waste of time just to include 1 photo so Ižd like to include 4 honourable mentions right here.

If you havenžt joined our forum I would encourage you to do so. We are an extremely friendly bunch that share and learn daily.

Herežs the winning photo by Michaelaw:

Wood Duck by Michaelaw

Herežs the winning photo by z-06-jim:

Navy 'LST 325' by z-06-jim


Here are the 2 honourable mentions in no particular order:

Frog/Toad by Michaelaw

First Action Pics by casil403

Filters for lens protection

There is a great debate among photographers as to whether or not lens filters need to be used for lens protection. Photographers are divided when it comes to filters and image quality. Many believe that adding a filter to the lens reduces the image quality while other photographers feel there are little to no effects to the photograph.


A filter is not only used to‚protect against every day use. UV filters offer protection against UV rays that may damage our lenses, and Skylight filters reduce the haze and clarify the photo. But really, are these truly necessary? Many photographers suggest that they have no noticeable effect in most circumstances. Lenses are made so strong today, that the question remains…”To use a filter, or not to use a filter?”

Feel free to add your comments here or join our photography forum and add to the conversation. Here’s a link to the topic in the photography forum.

Quality of Lenses

What real advantages are there when spending extra money on an expensive lens over its cheaper counterpart?


When comparing pro lenses to the ‘cheaper’ lenses, the higher priced lenses deliver better quality for the most part. Depending on the lens you might also get expedited auto-focus, sharper images and less chromatic aberration.‚ Perhaps the biggest advantage though is with regard to aperture. More expensive lenses are often faster. This means that their largest F-stop (smallest number eg. F1.8, F2.0, F2.8 etc) is usually larger than cheaper lenses. Remember, the larger the aperture, the more room you have to use a faster shutter speed. In addition, the larger the lens’s aperture, the easier it is to shoot in lower light because when you look through the viewfinder you are looking at a scene through the lens’s largest aperture. If a lens has a max aperture of F2.8, any scene you look at through your viewfinder will look BRIGHTER than if the lens’s widest aperture was F4.0. It makes no difference what F-stop you use during the actual exposure. This doesn’t make a difference in bright sunlight, but in makes a huge difference in low light where it is easier to focus if the viewfinder is brighter. On the negative side, higher priced lenses with larger apertures will often‚ buy you significantly more ‘weight’ as well.

When comparing the results of pro lenses to the ‘mid-range’ priced lenses (pro-consumer level), there doesn’t seem to be a noticeable difference to many advanced photographers so long as the images are kept small. This is especially true if the images are for Internet use only.

If you’re still skeptical and want to test the waters yourself, you can always take the same picture using two different lenses to prove a point. Or, an easier route is to search the web for someone who’s already taken the time to do it – much easier!

As a final point, when people (photography newbies/hobbyists) ask me what camera to buy, they never ask about lenses which is a monster mistake. I ALWAYS council newbies/hobbyists to spend MORE on the lenses than the camera, especially the first ‘expensive’ camera. This is because the camera is just a box with a flap to let light in. The LENS does all the focusing so a poor lens on an expensive camera will give you a poor result. A great lens on an average camera will give you a great result (in the right hands of course ;) )
When you’re just learning though you can easily learn on a used or lower end DSLR that you’ll surely replace as technology changes. The lenses though, you can keep those for decades. Trust me, spend the dough on the lenses.

Check out the link in our photography forum for more info.

67 – Orton Imagery – The Orton Effect – Interview with Michael Orton and Darwin Wiggett

Photography podcast #67 discusses how to use Orton Imagery (AKA the Orton effect or the Orton Technique) to give your photographs an ethereal/painterly feel. This technique was invented by Michael Orton in the mid 1980′s using 2 pieces of overexposed slide film sandwiched together. The principles of this technique can also be used in graphics programs like Photoshop to achieve a similar effect. This podcast contains 2 interviews; one with Michael Orton discussing‚ the technique’s history, and one with Darwin Wiggett,‚ discussing his method for creating Orton Imagery using Photoshop and other graphics programs. Darwin’s step-by-step is outlined below and his Photoshop action is also included. Thanks a ton Michael and Darwin!!

Image by Michael Orton - click to enlarge

Orton Imagery by Michael Orton - Click to enlarge

NMP2823 - Non-Orton image by Darwin Wiggett - Click to enlarge

NMP2823 - Non-Orton image by Darwin Wiggett - Click to enlarge

NMP2823 - Orton image by Darwin Wiggett - Click to enlarge

NMP2823 - Orton image by Darwin Wiggett - Click to enlarge

NMP9058 - Orton image by Darwin Wiggett - Click to enlarge

NMP9058 - Orton image by Darwin Wiggett - Click to enlarge

NMP6435 - Orton image by Darwin Wiggett - Click to enlarge

NMP6435 - Orton image by Darwin Wiggett - Click to enlarge

Here’s how to create Orton Imagery Using Photoshop. Portion reprinted from from Orton Imagery – A …œHow to‚ guide for Photographers by Darwin Wiggett. Thanks to Nature Photographers online magazine for allowing me to reprint this.

Digital Technique to Create Orton Images

Here, there are many ways to simulate an Orton slide sandwich. You can do it the same way as outlined above for slides overexposing two separate images and then in the computer stacking the images together in software and blending them. Personally, I prefer to take my existing digitized photos (either from film scans or digital camera files) and running them through the process below to see if they work as …œOrton Images‚.

Here is the step-by-step recipe for making Orton images in Photoshop:

  1. Open any image you wish to try the technique on. Make a duplicate of the image (Image>Duplicate). Close the original image.
  2. Lighten the image as follows: Image>Apply Image‚¦ then in the dialog box that comes up change the bending mode to …œScreen‚ and the Opacity to 100%. This will give you an appropriately overexposed image.
  3. Duplicate this overexposed image (Image>Duplicate).
  4. Blur this second image (Filter>Blur>Gaussian Blur‚¦ and in the dialog box use a Radius setting of 15 to 50 pixels ‚” the higher the pixel setting the blurrier the photo and the more ‹”painterlyž the image‚¦ but you can go too far!). Experiment with different settings, for my tastes and for the size of my digital files (50-100 megabytes) a radius of about 25 pixels works perfect.
  5. Now select the move tool from the Photoshop tool bar (or just press …œv‚ on your keyboard for quicker access to the move tool). Hold down the …œshift‚ key and use your mouse to drag and drop the blurry image onto the sharp one (donžt let go of the shift key until after you release the mouse button or the images wonžt be in perfect alignment).
  6. Bring up the layers palette in Photoshop (F7 is the keyboard shortcut). Under the word …œLayers‚ in the layers palette will be a menu box of blending modes. Change the blending mode from …œnormal‚ to …œmultiply‚.
  7. Now …œflattenž the two layers by pressing …œCTRL+E‚ or by clicking on the sideways triangle in the layers palette to select ‹”flatten imagež.

There, you now have an Orton image – if you like your new masterpiece save the file!

Copyright Darwin Wiggett and Nature Photographers Online Magazine – All rights reserved.
—————————————————————————————————

Dwayne Oaks from our photography forum also lists the way he uses the Orton effect using NX2 software. Thanks Dwayne.
1-use midtone (levels) slider to brighten photo (2.04)
2-select gaussian blur, set radius slider to (15.85)px and opacity to (100)%
go to blending mode and select (multiply)
3-readjust (levels) sliders if necessary
4-in the case of my work to get the muted colors just turn down
the saturation

Links /resources mentioned in this podcast:
More of Darwin Wiggett’s work on Timecatcher.com
Photographing Creative Landscapes: Simple Tools for Artistic Images and Enhanced Creativity by Michael Orton
Dances with Light by Darwin Wiggett
Download Darwin’s Orton Action
June’s low shooting angle assignment on the Photography.ca forum
See and vote on May 2009′s member images

If you are still lurking on our forum,
feel free to join our friendly :) Photography forum

Thanks as always to everyone that sent comments by email about our last podcast. Although ALL comments are appreciated, commenting directly in this blog is preferred. Thanks as well to all the new members of the bulletin board.

If you are looking at this material on any other site except Photography.ca – Please hop on over to the Photography.ca blog and podcast and get this and other photography info directly from the source. I Subscribe with iTunes I Subscribe via RSS feed I Subscribe with Google Reader I Subscribe for free to the Photography podcast – Photography.ca and get all the posts/podcasts by Email
You can download this photography podcast directly by clicking the preceding link or listen to it almost immediately with the embedded player below.

Removing Backgrounds from Images

So you’ve just taken the perfect shot of a pair of shoes for a client. But wait… ooops. The client didn’t want the shoes to be on the table. So what can be done to remove the table? There are a few ways to go about it. First (and most obvious) is to shoot the pair of shoes on a simple backdrop with no distractions.


But if this is not possible, Photoshop can help you achieve that ‘near perfect’ shoe shot by extracting it from the background. Photoshop’s selection tools work well to get the job done. The quick selection tool is great for simple extractions. The background eraser is another great tool. Although many people loved the extract tool in Photoshop CS3, it’s missing from CS4. (If you loved it and still have CS3, you can copy it from the CS3 Plug-ins-Filters folder to CS4).  But depending on the subject, these tools may miss out on some of the finer details like a model with frizzy hair. In cases like these, manually tracing the edges with the pen tool and then converting it to a selection is ideal. Tedious yes, but it will give you optimal results.

Pluggins are also available for removing backgrounds if you’re up for the expense.
Who knew shoes could be so technical?!
Link from our Photography forum

Removing Backgrounds from Images

So you’ve just taken the perfect shot of a pair of shoes for a client. But wait… ooops. The client didn’t want the shoes to be on the table. So what can be done to remove the table? There are a few ways to go about it. First (and most obvious) is to shoot the pair of shoes on a simple backdrop with no distractions.


But if this is not possible, Photoshop can help you achieve that ‘near perfect’ shoe shot by extracting it from the background. Photoshop’s selection tools work well to get the job done. The quick selection tool is great for simple extractions. The background eraser is another great tool. Although many people loved the extract tool in Photoshop CS3, it’s missing from CS4. (If you loved it and still have CS3, you can copy it from the CS3 Plug-ins-Filters folder to CS4).‚ But depending on the subject, these tools may miss out on some of the finer details like a model with frizzy hair. In cases like these, manually tracing the edges with the pen tool and then converting it to a selection is ideal. Tedious yes, but it will give you optimal results.

Pluggins are also available for removing backgrounds if you’re up for the expense.
Who knew shoes could be so technical?!
Link from our Photography forum