Photoshop file exposure and exif data

When we are work­ing on our images in pro­grams like Pho­to­shop, some­times we for­get the expo­sure infor­ma­tion in the orig­i­nal file. We can also for­get many other use­ful bits of infor­ma­tion that are embed­ded in the file like did the flash fire, what focal length was used etc.

In Light­room and Bridge (comes free with Pho­to­shop) this Exif data is easy to find, the default pro­gram set­tings reveal this infor­ma­tion clearly.  Not so in Pho­to­shop where it is buried under the file menu (in Windows).

File — File info.… reveals the Exif data for any image you are work­ing on in Pho­to­shop. Click on the Cam­era Data tab to see the expo­sure information.

The key­board short cut (Win­dows) ALT + SHIFT + CTRL +I does the same thing.
The key­board short cut (Mac) OPTION + SHIFT + COMMAND +I does the same thing.

How to find exposure or exif data in Photoshop

How to find expo­sure or exif data in Pho­to­shop (This is a CS6 win­dows screenshot)


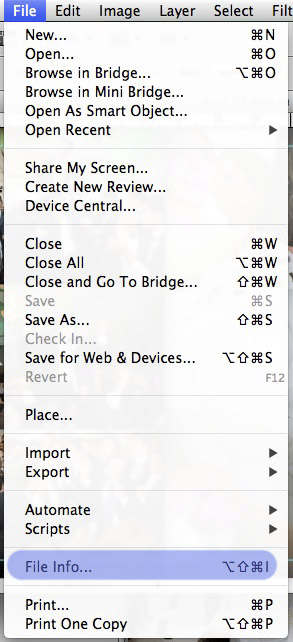
How to find exposure or exif data in Photoshop (This is a CS5 Mac screenshot)

How to find expo­sure or exif data in Pho­to­shop (This is a CS5 Mac screenshot)

Removing Backgrounds from Images

So you’ve just taken the per­fect shot of a pair of shoes for a client. But wait… ooops. The client didn’t want the shoes to be on the table. So what can be done to remove the table? There are a few ways to go about it. First (and most obvi­ous) is to shoot the pair of shoes on a sim­ple back­drop with no distractions.


But if this is not pos­si­ble, Pho­to­shop can help you achieve that ‘near per­fect’ shoe shot by extract­ing it from the back­ground. Photoshop’s selec­tion tools work well to get the job done. The quick selec­tion tool is great for sim­ple extrac­tions. The back­ground eraser is another great tool. Although many peo­ple loved the extract tool in Pho­to­shop CS3, it’s miss­ing from CS4. (If you loved it and still have CS3, you can copy it from the CS3 Plug-ins-Filters folder to CS4).‚ But depend­ing on the sub­ject, these tools may miss out on some of the finer details like a model with frizzy hair. In cases like these, man­u­ally trac­ing the edges with the pen tool and then con­vert­ing it to a selec­tion is ideal. Tedious yes, but it will give you opti­mal results.

Plug­gins are also avail­able for remov­ing back­grounds if you’re up for the expense.
Who knew shoes could be so tech­ni­cal?!
Link from our Pho­tog­ra­phy forum

Removing Backgrounds from Images

So you’ve just taken the per­fect shot of a pair of shoes for a client. But wait… ooops. The client didn’t want the shoes to be on the table. So what can be done to remove the table? There are a few ways to go about it. First (and most obvi­ous) is to shoot the pair of shoes on a sim­ple back­drop with no distractions.


But if this is not pos­si­ble, Pho­to­shop can help you achieve that ‘near per­fect’ shoe shot by extract­ing it from the back­ground. Photoshop’s selec­tion tools work well to get the job done. The quick selec­tion tool is great for sim­ple extrac­tions. The back­ground eraser is another great tool. Although many peo­ple loved the extract tool in Pho­to­shop CS3, it’s miss­ing from CS4. (If you loved it and still have CS3, you can copy it from the CS3 Plug-ins-Filters folder to CS4).  But depend­ing on the sub­ject, these tools may miss out on some of the finer details like a model with frizzy hair. In cases like these, man­u­ally trac­ing the edges with the pen tool and then con­vert­ing it to a selec­tion is ideal. Tedious yes, but it will give you opti­mal results.

Plug­gins are also avail­able for remov­ing back­grounds if you’re up for the expense.
Who knew shoes could be so tech­ni­cal?!
Link from our Pho­tog­ra­phy forum

How to Vignette

How to make a per­fect Vignette‚¦ add 1 cup oil to ‚½ cup vine­gar, dash with‚¦ now wait a minute. Not Vinai­grette. VIGNETTE. It’s the amaz­ing effect of hav­ing the cen­tral por­tion of the image show­ing while the rest of the image is dark­ened. Pho­tog­ra­phers can apply this effect to their pho­tos to add more empha­sis to their subject.


Pho­to­shop pro­vides numer­ous meth­ods to mas­ter the vignette. Want some insight? You can use an ellip­ti­cal mar­quee tool, inverse the selec­tion, and blur the four cor­ners. You can also brighten or darken the four cor­ners by work­ing with the level bal­ance on the inversed selec­tion. Lens cor­rec­tion (Fil­ter ‚” Dis­tort) also works well for adding a vignette. These are only two meth­ods, but there are cer­tainly more.

But what about those who pre­fer work­ing in a dark­room to achieve their artis­tic photo effects? In the dark­room, this is done by hold­ing an opaque mate­r­ial with a cir­cle or oval cut-out dur­ing the exposure.

Either way, a vignette can add drama or even soften a pho­to­graph all at once. The pos­si­bil­i­ties are endless.

FORUM LINK: http://www.photography.ca/Forums/showthread.php?p=17647