Photography podcast #116 features an interview with German landscape photographer Michael Breitung where we talk about why and how to do focus stacking in photography. Basically focus stacking involves taking multiple frames of the same scene but each frame is focused at a different part of the image. Then these frames are blended together using a graphics program like Gimp (free) or Photoshop (expensive). The result is sharpness and depth of field on steroids that can’t be matched by any camera lens combination on a 35mm DSLR camera at the time of this writing. Only tilt shift lenses can compete in this extreme sharpness arena, but those lenses require many saved dollars or a rich uncle. This technique is free if you have the skills and a graphics program.
Scroll to the BOTTOM of this post to find the player to immediately listen to the audio podcast.
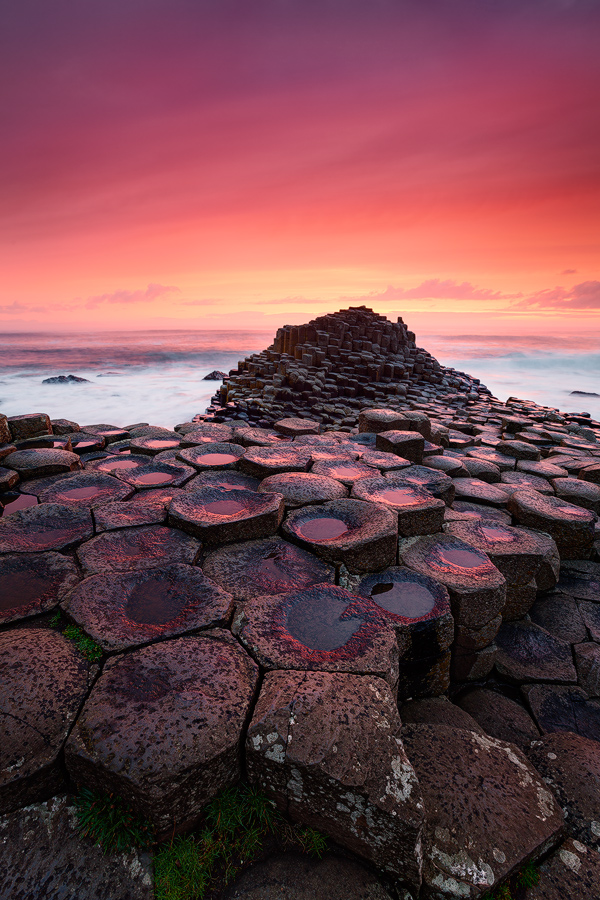
Bloody Causeway by Michael Breitung — This focus stacked image blends 4 frames into one. Each frame was focused at a different point and then blended in Photoshop. Check out the sharpness from the closest corners all the way to the end of the causeway. This is sharpness swimming in awesome sauce. The aperture used here was f/9.5
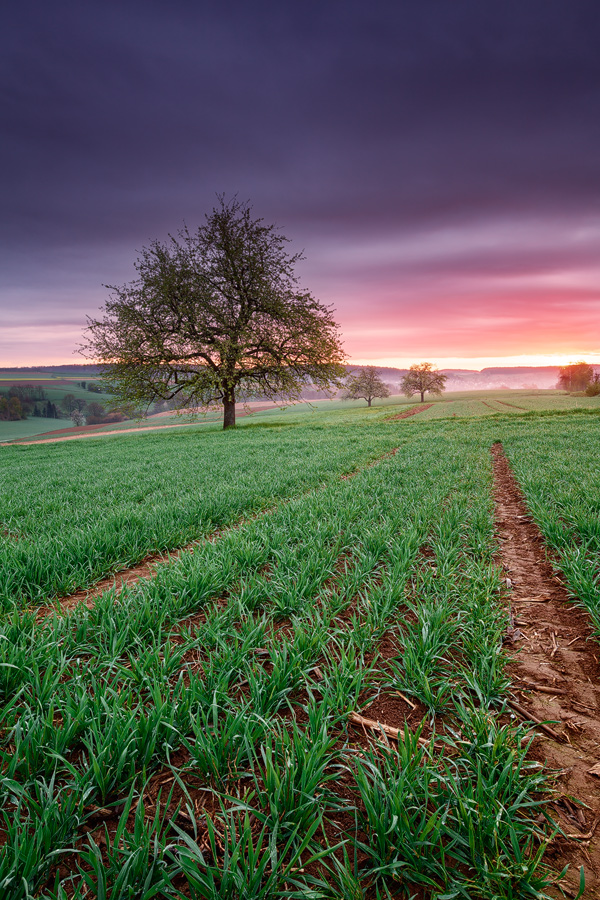
Kraichgau at Dawn — Focus stacked photograph by Michael Breitung
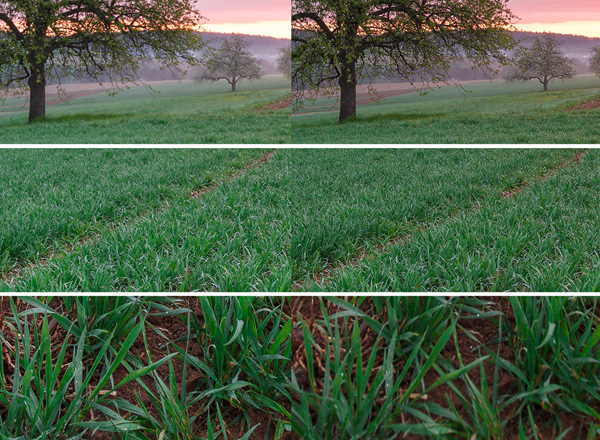
Kraichgau at Dawn Details — Close up comparison by Michael Breitung — Only 2 frames were needed to create the final full-sized image above this one. One frame (left) focused at the foreground corners, gets the corners sharp in the final image. The other frame (right) focused at the midground, gets both the midground and the background sharp. Then the frames are blended in Photoshop to produce the final image. The aperture used here was f/11.
Links /resources mentioned in this podcast:
Michael Breitung Photography
Michael Breitung’s (advanced) start to finish tutorial on his (Lightroom/Photoshop) post-processing workflow and how he created the Bloody Causeway image.
Helicon Focus image stacking software
Zerene Stacker
Tilt shift lenses in landscape photography
March 2013 regular Assignment — Wet or Rain
March 2013 level 2 Assignment — Dramatic angles
If you liked this podcast and want to review it on Itunes, this link gets you to the main page
If you are interested in writing for our blog please contact me photography.ca ( A T ) G m ail Dot co m (using standard email formatting)
Please join the Photography.ca fan page on Facebook
My Facebook profile — Feel free to “friend” me — please just mention Photography.ca
My Twitter page — I will follow you if you follow me — Let’s connect — PLEASE email me and tell me who you are in case I don’t reciprocate because I think you are a spammer.
If you are still lurking on our forum,
feel free to join our friendly ![]() Photography forum
Photography forum
Thanks to D. Lavoie who posted a blog comment about our last podcast. Thanks as well to everyone that sent comments by email about our last podcast. Although ALL comments are appreciated, commenting directly in this blog is preferred. Thanks as well to all the new members of the bulletin board. Most of the links to actual the products are affiliate links that help support this site. Thanks in advance if you purchase through those links.
If you are looking at this material on any other site except Photography.ca — Please hop on over to the Photography.ca blog and podcast and get this and other photography info directly from the source. |Subscribe with iTunes|Subscribe via RSS feed |Subscribe with Google Reader|Subscribe for free to the Photography podcast — Photography.ca and get all the posts/podcasts by Email
You can download this photography podcast directly by clicking the preceding link or listen to it almost immediately with the embedded player below.
Thanks for listening and keep on shooting!
Podcast: Play in new window | Download