Fuji X-T1 — A Fine Camera for Almost Everything

Thanks to our part­ner­ship with The Cam­era Store (The largest cam­era store in Cal­gary Alberta Canada), I recently tested The Fuji X-T1 w/the Fuji XF 18-135mm f/3.5–5.6 lens. The Fuji X-T1 is a solid, retro-looking mir­ror­less cam­era that I’ve been want­ing to test for a few months as it has been get­ting seri­ously good reviews and some pros have even touted it as a DSLR killer. Although I love my DSLR (Nikon D800E replaced by the D810), it’s heavy and a pain to carry around for hours and hours at a time. I’m always inter­ested to test smaller cam­eras that can give my DSLR a good fight for its money in the hopes that one day I can just bury the DSLR beast.
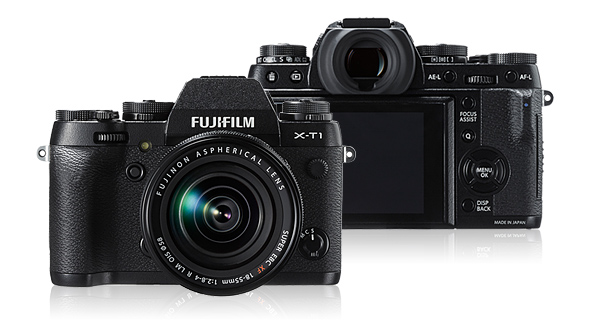
Fuji X-T1

Fuji X-T1


For those that want the con­clu­sion at the begin­ning, I really liked the Fuji– XT1 and I’ll talk about why in a few para­graphs, but let’s get that DSLR killer thing out of the way.

Straight off the bat this is one of the best mir­ror­less or point and shoot dig­i­tal cam­eras I have tested. It goes head to head to with my DSLR on many lev­els. That said, it can­not kill my DSLR or even lower priced DSLRs built in the past cou­ple of years because it can’t track and cap­ture mov­ing sub­jects with the same ease. I’m NOT a sports pho­tog­ra­pher but I reg­u­larly want to shoot a bird, squir­rel, fast mov­ing dog, or run­ning baby. For me, a DSLR killer must be able to track and cap­ture a mov­ing sub­ject with the same ease and effi­cacy (and ratio of keep­ers) as a DSLR. The X-T1 can­not eas­ily do this and admits to being unable to do this on page 68 of the man­ual. It’s the one big thing that’s miss­ing for me in this (and every other mir­ror­less or point and shoot on the mar­ket today) cam­era. It does a bet­ter job at this task than all the other mir­ror­less or point and shoot cam­eras I’ve tried, but DSLRs cost­ing the same or less money as this cam­era will get you sharper results with greater ease. If you accept this lim­i­ta­tion and you have the bud­get for it ($2100. for the cam­era and lens) it’s the best non-DSLR cam­era that I’ve tried.

Here’s a check­list of the main things I really liked about the Fuji X-T1

1 — Solid feel and size — The Fuji  X-T1 is a solid feel­ing metal cam­era and I like that. I’m sick of pla­s­ticky feel­ing devices. This cam­era is VERY rem­i­nis­cent of my old Nikon FM2 film cam­era in terms of shape, size and weight. One of the main advan­tages of this cam­era is that it is much smaller and weighs less than most DSLRs. The FUJI X-T1 weighs 440 grams with the cam­era and card. My D800E with bat­tery and card weighs more than dou­ble (994 grams)!

Comparison between the new Fuji XT-1 and the 30ish year old Nikon F3. Hat tip and © Wendy Kennedy for this image.

Size com­par­i­son between the new Fuji XT-1 and a 30ish year old Nikon F3. Hat tip and © Wendy Kennedy for this image.


2 — Over­all sharp­ness — Aside from sharp­ness on fast mov­ing sub­jects, you will love the sharp­ness of this camera!

The XT-1 gives you lovely natural colours. Images are sharp straight out of the camera.

The XT-1 gives you lovely nat­ural colours. Images are sharp straight out of the cam­era. Exif — ISO 400, f/5.6, 1/100. Note:  I did NOT try to get the birds sharp in this image, I was fram­ing the peo­ple on the bench and the mov­ing birds were a happy coincidence.


3 — Auto­matic elec­tronic viewfinder  - You can frame your scene by look­ing at the back of the LCD screen or through the viewfinder. The cam­era ‘knows’ when you bring the viewfinder to your eye and all inte­rior con­trols become instantly vis­i­ble — It’s very cool.

4 — Hori­zon line — This appears auto­mat­i­cally in order to let you know if your cam­era is par­al­lel to the sub­ject for dis­tor­tion free images. I really like this but you can shut it off if you don’t.

5 — Shoots in RAW for­mat, Jpeg and RAW/Jpeg

6 — Although I already ragged on the aut­o­fo­cus being infe­rior for mov­ing sub­jects when com­pared to a DSLR, it does a bet­ter job than all other non-DSLR cam­era that I’ve tried. In addi­tion it has focus points that you can move around your screen fairly eas­ily to allow the aut­o­fo­cus to focus where you want. I use these focus points all the time when I’m fram­ing a scene.

In order to assure sharp eyes (or sharp anything) I am always moving the auto-focusing square to exactly where I want the most sharpness to be. In this case, I moved it right over my boy Baci's eye. The Fuji XT-1 does a decent job at this! (Not as good as most DSRs mind you, but MUCH better than most mirrorless/point and shoot cameras I've tried). As an aside, this was a relatively low light shot with EXIF data at ISO 6400, f/4.7 at 1/80.
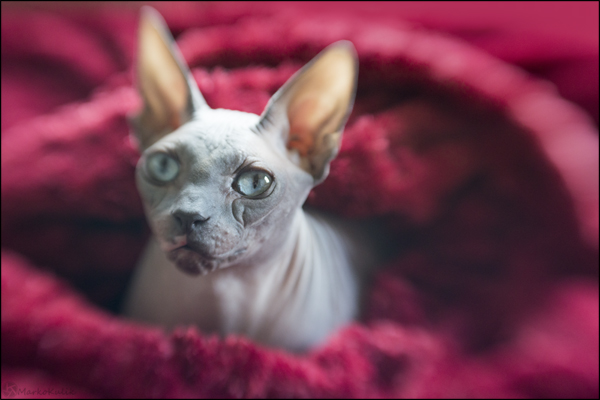
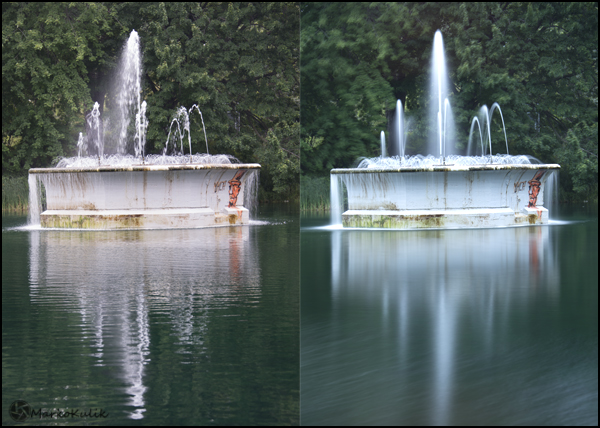
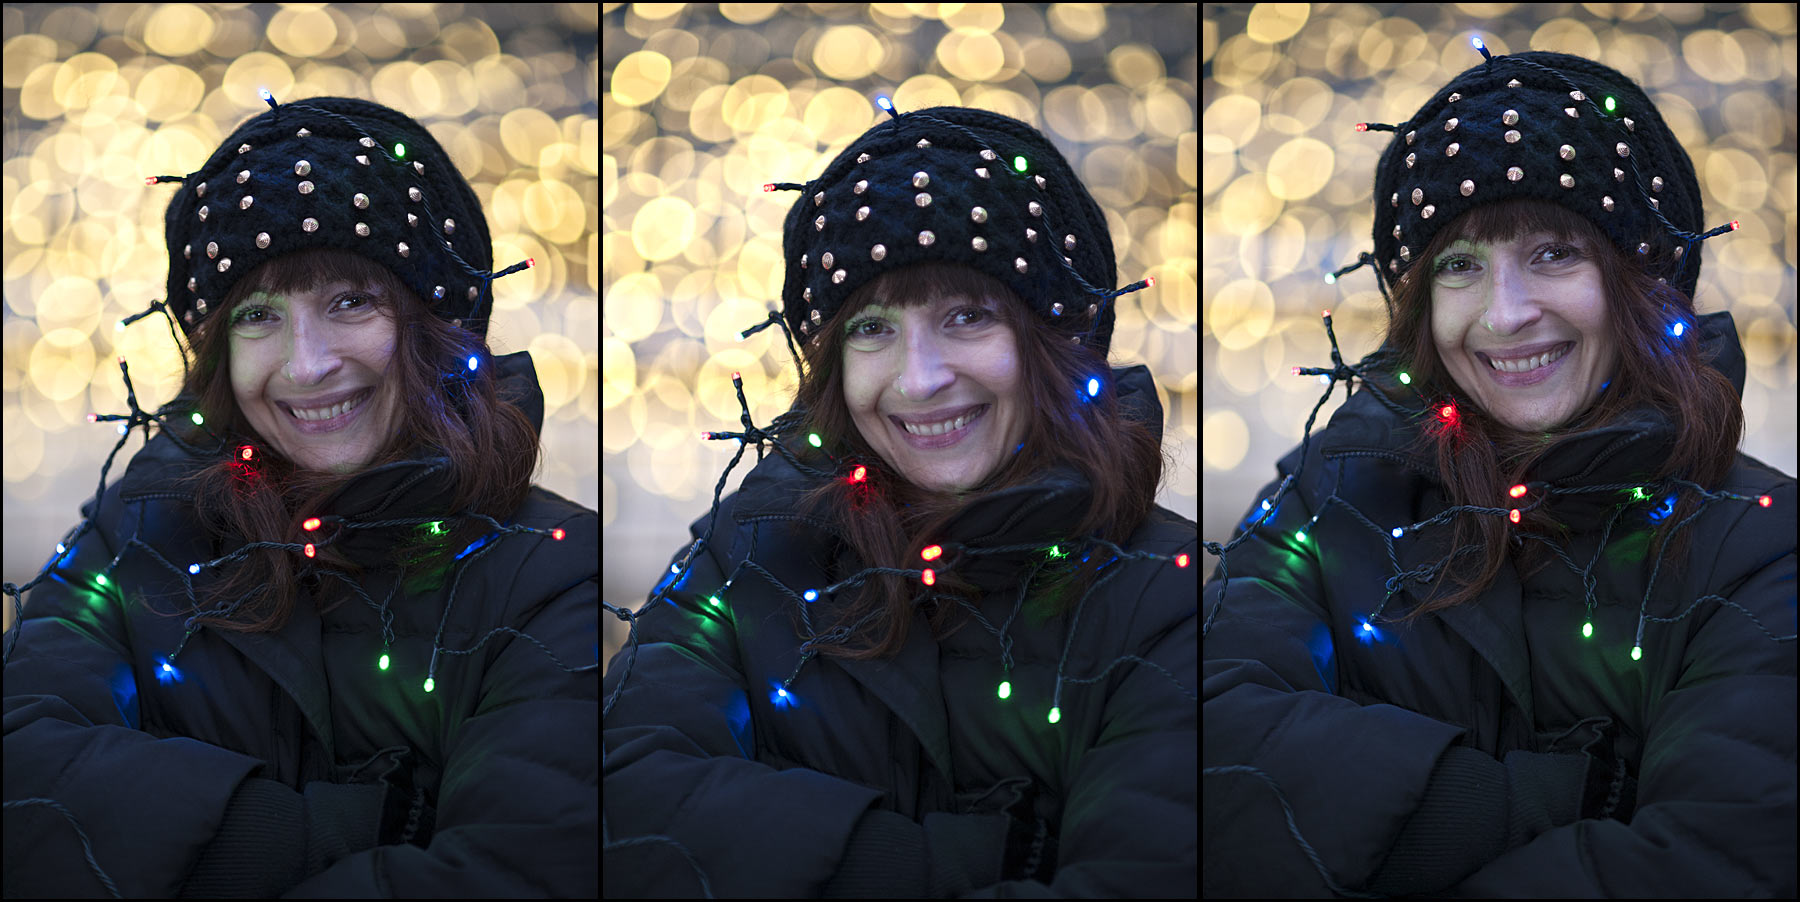
In order to assure sharp eyes (or sharp any­thing) I am always mov­ing the auto-focusing square to exactly where I want the most sharp­ness to be. In this case, I moved it right over my boy Baci’s eye. The Fuji X-T1 does a decent job at this! (Not as fluid as most DSRs mind you, but MUCH bet­ter than most mirrorless/point and shoot cam­eras I’ve tried).
As an aside, this was a rel­a­tively low light shot with EXIF data at ISO 6400, f/4.7 at 1/80.


7  - Low light shoot­ing. This cam­era does a killer-good job in low light!  It’s a low light maven! This image below was shot/pushed at ISO 12800. I never shoot at this ISO because nor­mally you get tons of noise (pixelization/grain) at this speed. But look how accept­able this image is! I have even included a 100% crop of a por­tion of the image with shadow detail as noise is most vis­i­ble in the shad­ows. Yes there is noise in those shad­ows but it’s accept­able noise, it’s not a hail­storm. Most mirrorless/point and shoot cam­eras (and most DSLRs) on the mar­ket today are infe­rior to the Fuji X-T1 with regard to their low-light and low-noise performance.

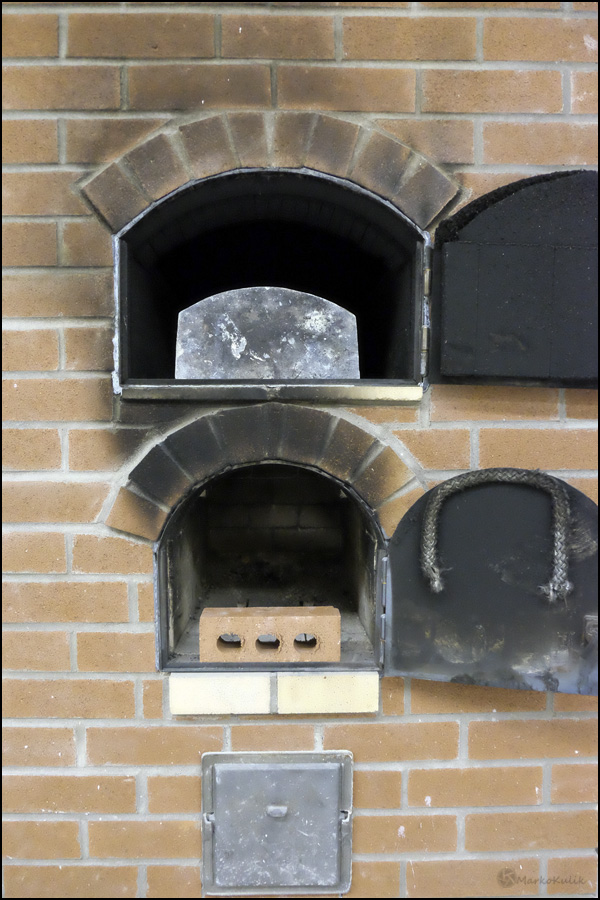
This image was shot at f/3.5 at 1/110 at ISO 12800! Look how acceptable the noise level is.

This image was shot at f/3.5 at 1/110 at ISO 12800! Look how accept­able the noise level is.

Here’s a 100% crop from the same image.

Noise is its nastiest in the shadows but look at how well the noise is handled at ISO 12800 - Very, very impressive!

Noise is its nas­ti­est in the shad­ows but look at how well the noise is han­dled at ISO 12800 — Very, very impressive!


X-T1 Gripes

As hinted at pre­vi­ously, my main gripe with the X-T1 (and every other point and shoot/mirrorless cam­era that I’ve tried) is that it can­not aut­o­fo­cus fast enough to cap­ture fast mov­ing objects as sharp as I like them. Here is a shot of a squir­rel. I admit it’s very good for cam­eras in its class but my DSLR and most oth­ers I’ve tried does better.

This is a 100% crop detail of a squirrel. I focused on the eye for about 15 images and the eye is good but it is not tack sharp. My DSLR has a much better ratio of keepers for difficult shots like these. EXIF data was ISO 800 f/5.6 1/850

A 100% crop detail of a squir­rel. I focused on the eye for about 15 images and the eye in this image is good but it is not tack sharp. My DSLR has a much bet­ter ratio of keep­ers for dif­fi­cult shots like these. EXIF data was ISO 800, f/5.6 @ 1/850


The main other gripe would be the price as $2100. for a mir­ror­less cam­era and lens is quite a chunk of change when DSLRs with lenses can be had for many hun­dreds of dol­lars less. That said, we should be used to pay­ing more for devices that are phys­i­cally smaller; it’s the trend across so many con­sumer prod­ucts. To tem­per the price blow a bit, this cam­era is very ver­sa­tile and can accom­mo­date many dif­fer­ent lenses of vary­ing focal lengths. It’s solidly built and it seems like it will last.

In con­clu­sion, if you have the bud­get for this cam­era you will love its size, shape, feel and its weight. The qual­ity and sharp­ness of the files are superb and as long as you don’t expect tack sharp eyes from mov­ing sub­jects, you will love this cam­era. To date, it’s the best non DSLR cam­era I’ve tried.

131– The Lensbaby Composer Review

Pho­tog­ra­phy pod­cast #131 reviews a Lens­baby lens. Lens­baby lenses are spe­cial in that they have a sweet spot of sharp focus in the cen­ter of the lens and blur out toward the edges. In addi­tion to this (and where the magic truly lives), you can actu­ally bend the lens to move that sweet spot of focus around the frame. The par­tic­u­lar lens I tested was a 50mm Lens­baby Com­poser with dou­ble glass optic. It’s great fun and fairly easy to use though you need to know in advance that it’s a man­ual lens. It will still help you fig­ure out expo­sure based on your ISO and aper­ture ring you select, but you’ll be going old school and man­u­ally focus­ing this bad-boy. It’s worth it though as you can make some really cre­ative in-camera images with this lens. It’s a fab­u­lous lens to juice up your creativity.

Thanks to The Cam­era Store (The largest cam­era store in Cal­gary, Alberta, Canada)  for spon­sor­ing the Photography.ca pod­cast and for allow­ing me to test this lens.

Click the player at the end of this post to lis­ten to (or down­load) the 11ish minute podcast.

My hairless cat Baci with the Lensbaby Composer. Note his sharp central eye while everything else fades to blur

My hair­less cat Baci with the Lens­baby Com­poser. Note his sharp cen­tral eye while every­thing else fades to blur


Lensbaby Composer


This is an image of the Jacques-Cartier Bridge in Montreal, Quebec. It was very easy to see and capture this effect in camera.

This is an image of the Jacques-Cartier Bridge in Mon­treal, Que­bec. It was very easy to see and cap­ture this effect in camera.


This is an image of the Jacques-Cartier Bridge in Montreal, Quebec. Because the bridge was not centered in the lens, I had to physically move the sharp sweet spot of focus by actually bending the lens.  This image took a little longer to compose.

An image of the Jacques-Cartier Bridge in Mon­treal, Que­bec. Because the bridge was not cen­tered in the lens, I had to phys­i­cally move the sharp sweet spot of focus by actu­ally bend­ing the lens and thus the image took longer to compose.


Norco Bicycle shot with the Lensbaby Composer

Norco Bicy­cle shot with the Lens­baby Composer


Links /resources men­tioned in this podcast:

Lens­baby Com­poser user guide
The Lens­baby Com­poser  and other Lens­ba­bies at The Cam­era Store
Tilt shift lenses for land­scape pho­tog­ra­phy
Lens­baby 3G review

If you liked this pod­cast and want to review it on Itunes, this link gets you to the main page

If you are inter­ested in writ­ing for our blog please con­tact me photography.ca ( A T ) G m ail Dot co m (using stan­dard email formatting)

Please join the Photography.ca fan page on Facebook

My Face­book pro­file — Feel free to “friend” me — please just men­tion Photography.ca
My Twit­ter page — I will fol­low you if you fol­low me — Let’s con­nect — PLEASE email me and tell me who you are in case I don’t rec­i­p­ro­cate because I think you are a spammer.

If you are still lurk­ing on our forum,
feel free to join our friendly :)  Pho­tog­ra­phy forum

Although ALL com­ments are appre­ci­ated, com­ment­ing directly in this blog is pre­ferred. Many thanks to Bare­foot, Troy Borque and Terry Babij for their com­ments from the last pod­cast. Thanks as well for the emails and wel­come to all the new mem­bers of the bul­letin board.

If you are look­ing at this mate­r­ial on any other site except Photography.ca — Please hop on over to the Photography.ca blog and pod­cast and get this and other pho­tog­ra­phy info directly from the source. |Sub­scribe with iTunes|Sub­scribe via RSS feed |Sub­scribe for free to the Pho­tog­ra­phy pod­cast — Photography.ca and get all the posts/podcasts by Email

You can down­load this pho­tog­ra­phy pod­cast directly by click­ing the pre­ced­ing link or lis­ten to it almost imme­di­ately with the embed­ded player.

Thanks for lis­ten­ing and keep on shooting!

130 — The Big Stopper Filter Review

Pho­tog­ra­phy pod­cast #130 reviews the Big Stop­per by Lee fil­ters. The big stop­per is a 10 stop glass fil­ter that slows down shut­ter speeds in order to accen­tu­ate move­ment. Both clouds and water are clas­sic sub­jects for use with this fil­ter and the result­ing pho­tographs tend to be ethe­real and dreamy. Aside from review­ing the fil­ter, I offer up 6 tips on how to use it effectively.

Thanks to The Cam­era Store (The largest cam­era store in Cal­gary, Alberta, Canada)  for spon­sor­ing the Photography.ca podcast.

Click the player at the end of this post to lis­ten to (or down­load) the 18ish minute podcast.

This evening image of Rue Laurier in Montreal is a long exposure image using the big stopper. You can see movement in the clouds, and in the cars. The people look 'ghostlike' because they moved (somewhat) in place while waiting for the traffic light. Notice the traffic light has all 3 colours lit because the traffic light cycled during this 30 second exposure. Exif data -  ISO 100  f/11 30 second shutter speed.

This evening image of Rue Lau­rier in Mon­treal is a long expo­sure image using the big stop­per. You can see move­ment in the clouds, and in the cars. The peo­ple look ‘ghost­like’ because they moved (some­what) in place while wait­ing for the traf­fic light. Notice the traf­fic light has all 3 colours lit because the traf­fic light cycled dur­ing this 30 sec­ond expo­sure. Exif data — ISO 100, f/11, 30 sec­ond shut­ter speed.


Fast moving water at Chutes Dorwin in Rawdon, QC. Canada. In the top image I used my lowest ISO (50) with my smallest aperture (f/32) and this yielded a shutter speed of .4 seconds. The water does look dreamy. But when I used the big stopper, I was able to get much slower shutter speeds and the lower image was exposed for 15 seconds. It's much dreamier and more ethereal looking. If you look at the top of the bottom image you can see where flare entered my camera. This is easily solved with a hat (or postprocessing).

Fast mov­ing water at Chutes Dor­win in Raw­don, QC. Canada. In the top image I used my low­est ISO (50) with my small­est aper­ture (f/32) and this yielded a shut­ter speed of .4 sec­onds. The water does look dreamy. But when I used the big stop­per, I was able to get much slower shut­ter speeds and the lower image was exposed for 15 sec­onds. It’s much dreamier and more ethe­real look­ing but the fil­ter must be used with care. If you look at the top of the bot­tom image you can see a rain­bow­ish arc and this where flare entered my cam­era. As dis­cussed in the pod­cast, this is eas­ily solved with a hat (or postprocessing).


Fountain at Parc Lafontaine in Montreal, QC., Canada - The slowest shutter speed I could get without a filter was 1/60 in this light.  When I put the big stopper on, It extends the available shutter speeds big time. The image on the right was a 15 second exposure using the big stopper and look how dreamy the water looks.

Foun­tain at Parc Lafontaine in Mon­treal, QC., Canada — The slow­est shut­ter speed I could get with­out a fil­ter was 1/60 in this light. When I put the big stop­per on, It extends the avail­able shut­ter speeds big time. The image on the right was a 15 sec­ond expo­sure using the big stop­per and look how dreamy the water looks.


How the lee filter system works

How the Lee fil­ter sys­tem works


Links /resources men­tioned in this podcast:

Pod­cast 77 - On Neu­tral den­sity fil­ters and grad­u­ated neu­tral den­sity fil­ters
Pod­cast 84 - Back But­ton aut­o­fo­cus
The big stop­per at The Cam­era Store
Reg­u­lar forum assign­ment — Rep­e­ti­tion
Level 2 pho­tog­ra­phy assign­ment — Forced perspective

If you liked this pod­cast and want to review it on Itunes, this link gets you to the main page

If you are inter­ested in writ­ing for our blog please con­tact me photography.ca ( A T ) G m ail Dot co m (using stan­dard email formatting)

Please join the Photography.ca fan page on Facebook

My Face­book pro­file — Feel free to “friend” me — please just men­tion Photography.ca
My Twit­ter page — I will fol­low you if you fol­low me — Let’s con­nect — PLEASE email me and tell me who you are in case I don’t rec­i­p­ro­cate because I think you are a spammer.

If you are still lurk­ing on our forum,
feel free to join our friendly :)  Pho­tog­ra­phy forum

Although ALL com­ments are appre­ci­ated, com­ment­ing directly in this blog is preferred.

If you are look­ing at this mate­r­ial on any other site except Photography.ca — Please hop on over to the Photography.ca blog and pod­cast and get this and other pho­tog­ra­phy info directly from the source. |Sub­scribe with iTunes|Sub­scribe via RSS feed |Sub­scribe for free to the Pho­tog­ra­phy pod­cast — Photography.ca and get all the posts/podcasts by Email

You can down­load this pho­tog­ra­phy pod­cast directly by click­ing the pre­ced­ing link or lis­ten to it almost imme­di­ately with the embed­ded player.

Thanks for lis­ten­ing and keep on shooting!

128 — Your First Lens Should be a Nifty 50mm

Pho­tog­ra­phy pod­cast #128 talks about five rea­sons why I think the 50mm lens is the first lens you should get for your SLR or DSLR. Two of these rea­sons are all the aper­ture advan­tages this lens has to offer has and the fact that it’s one of the most afford­able brand new lenses you are likely to find (that aren’t garbage).

If you have a full frame cam­era the 50mm will act as the con­ven­tional 50mm lens from the film cam­era days. On a crop sen­sor cam­era the lens will act more like a 75mm or 80mm lens and many peo­ple are using this lens to make won­der­ful portraits.

Thanks to The Cam­era Store (The largest cam­era store in Cal­gary, Alberta, Canada)  for spon­sor­ing the Photography.ca podcast.

Click the player at the end of this post to lis­ten to (or down­load) the 8ish minute podcast.

This is a 50mm lens and it's the first lens you should buy.

This is a 50mm lens — It’s the first lens you should buy for your DSLR or SLR.


This image was shot on a full frame DSLR using a 50mm lens at Palais Des Congres in Montreal, QC, Canada.  The exposure was ISO 400 f/1.8 at 1/2500

This image was shot on a full frame DSLR using a 50mm lens at Palais Des Con­gres in Mon­treal, QC, Canada. The expo­sure was ISO 400 f/1.8 at 1/2500


Links /resources men­tioned in this podcast:

Good com­ments from our last pod­cast - Point and Shoot Cam­eras Suck for Learn­ing Photography

The Canon 50mm at The Cam­era Store
The Nikon 50mm at The Cam­era Store
Revers­ing rings at The Cam­era Store

The Canon 50mm at B&H
The Nikon 50mm at B&H
Revers­ing rings at B&H

If you liked this pod­cast and want to review it on Itunes, this link gets you to the main page

If you are inter­ested in writ­ing for our blog please con­tact me photography.ca ( A T ) G m ail Dot co m (using stan­dard email formatting)

Please join the Photography.ca fan page on Facebook

My Face­book pro­file — Feel free to “friend” me — please just men­tion Photography.ca
My Twit­ter page — I will fol­low you if you fol­low me — Let’s con­nect — PLEASE email me and tell me who you are in case I don’t rec­i­p­ro­cate because I think you are a spammer.

If you are still lurk­ing on our forum,
feel free to join our friendly :)  Pho­tog­ra­phy forum

Although ALL com­ments are appre­ci­ated, com­ment­ing directly in this blog is pre­ferred. Many thanks to Alain Casault, Lisa Osta, and Tom Trot­tier for their com­ments from the last pod­cast. Thanks as well for the emails and wel­come to all the new mem­bers of the bul­letin board.

If you are look­ing at this mate­r­ial on any other site except Photography.ca — Please hop on over to the Photography.ca blog and pod­cast and get this and other pho­tog­ra­phy info directly from the source. |Sub­scribe with iTunes|Sub­scribe via RSS feed |Sub­scribe for free to the Pho­tog­ra­phy pod­cast — Photography.ca and get all the posts/podcasts by Email

You can down­load this pho­tog­ra­phy pod­cast directly by click­ing the pre­ced­ing link or lis­ten to it almost imme­di­ately with the embed­ded player.

Thanks for lis­ten­ing and keep on shooting!


127 — Point and Shoot Cameras Suck for Learning Photography

Pho­tog­ra­phy pod­cast #127 goes into why point and shoot cam­eras suck for learn­ing pho­tog­ra­phy. I actu­ally rag on point and shoot cam­eras quite a bit in this pod­cast but it’s because pho­tog­ra­phy should be fun and learn­ing pho­tog­ra­phy on a point and shoot cam­era is rarely fun and almost never user-friendly. At the begin­ning stages of learn­ing pho­tog­ra­phy you need your cam­era to be user-friendly and it’s nice when your cam­era can han­dle any shoot­ing sit­u­a­tion. Point and shoots are infe­rior to any new DSLRs when it comes to pho­tograph­ing things that move. Given that pre­cious mem­o­ries (that involve move­ment) like your child walking/running are missed with a point and shoot, it’s an infe­rior tool.

That lovely intro aside, I do rec­om­mend a few user friendly Point and shoots for pho­tog­ra­phers that are com­fort­able with a Point and shoot’s lim­i­ta­tions. They def­i­nitely are portable and can be handy in capa­ble hands.

Click the player at the end of this post to lis­ten to (or down­load) the 13ish minute podcast.

Thanks to The Cam­era Store (The largest cam­era store in Cal­gary, Alberta, Canada)  for spon­sor­ing the Photography.ca podcast.

This point and shoot camera is not a good camera for learning photography

This point and shoot cam­era is not a good cam­era for learn­ing photography


Links /resources men­tioned in this podcast:

Pod­cast # 76 - Point and shoot cam­eras — Review of Canon G11
Expo­sure exposed — Eas­ily mas­ter cam­era expo­sure and make stun­ning pho­tos by Marko Kulik
Photo tours — pri­vate photo instruc­tion in Mon­treal
Canon G16 at The Cam­era Store
Nikon P7800 at The Cam­era Store
The Eos Rebel T5 at The Cam­era Store
The Nikon D3200 at The Cam­era Store

If you liked this pod­cast and want to review it on Itunes, this link gets you to the main page

If you are inter­ested in writ­ing for our blog please con­tact me photography.ca ( A T ) G m ail Dot co m (using stan­dard email formatting)

Please join the Photography.ca fan page on Facebook

My Face­book pro­file — Feel free to “friend” me — please just men­tion Photography.ca
My Twit­ter page — I will fol­low you if you fol­low me — Let’s con­nect — PLEASE email me and tell me who you are in case I don’t rec­i­p­ro­cate because I think you are a spammer.

If you are still lurk­ing on our forum,
feel free to join our friendly :)  Pho­tog­ra­phy forum

Although ALL com­ments are appre­ci­ated, com­ment­ing directly in this blog is pre­ferred. Thanks as well to all the new mem­bers of the bul­letin board.

If you are look­ing at this mate­r­ial on any other site except Photography.ca — Please hop on over to the Photography.ca blog and pod­cast and get this and other pho­tog­ra­phy info directly from the source. |Sub­scribe with iTunes|Sub­scribe via RSS feed |Sub­scribe for free to the Pho­tog­ra­phy pod­cast — Photography.ca and get all the posts/podcasts by Email

You can down­load this pho­tog­ra­phy pod­cast directly by click­ing the pre­ced­ing link or lis­ten to it almost imme­di­ately with the embed­ded player.

Thanks for lis­ten­ing and keep on shooting!

The Nikon 105 with Defocus Control is Dreamy

The Nikon 105 f2.0 DC lens is one of the most inter­est­ing lenses that I’ve ever tried. I just tested one from The Cam­era Store. This lens is super-solidly con­structed, mostly of metal, and feels great both in your hand and on the cam­era. It has a built in lens hood which I found con­ve­nient but the high­light of this lens is the defo­cus con­trol which brings its cool­ness fac­tor to eleven.  What’s cool about this DC (Defo­cus Con­trol) lens, is that you can defo­cus the fore­ground or the back­ground to accen­tu­ate the bokeh (zone of blurriness/creaminess/dreaminess) in the fore­ground or the back­ground. It takes a lit­tle bit of play and the results are sub­tle, but if you are into this type of sub­tlety and you are pre­pared to pay more than a grand, you won’t be dis­ap­pointed. This lens is in a class all by itself.

Nikon AF DC105mm f/2.0 D Lens

Nikon AF DC 105mm f/2.0 D Lens


Let me say imme­di­ately that this spe­cialty lens is not for every­one. It is made in my esti­ma­tion for por­trait, land­scape or fine art pho­tog­ra­phers that love to play with selec­tive focus and who want to be in supreme con­trol of their bokeh. If this last sen­tence was con­fus­ing then you are prob­a­bly not ready for this lens. But if you already love bokeh and want to play in the bokeh-olympics, this might be the finest tool available.

But Doesn’t Nikon Have Another 105mm Lens That Also Does Macro?

Yes they do and that lens is another fab­u­lous por­trait lens that does true macro. The Nikon AF-S 105 mm F2.8 Micro is a lens that I’ve owned for a num­ber of years and it’s about 300. cheaper than the DC lens. It’s razor sharp, has Vibra­tion Reduc­tion (VR) and does true 1:1 Macro. If you like to do por­traits as well as Macro work, get this lens instead.

But if you don’t do that much Macro and want a fab­u­lously unique tool that is great for por­traits and bokeh-play, the DC may be the bet­ter choice for an expe­ri­enced pho­tog­ra­pher. The DC lens is also an f/2 lens. The f/2 is brighter in the viewfinder and always deliv­ers more bokeh than f/2.8 all things being equal.

In terms of head to head sharp­ness and aut­o­fo­cus speed, I found the aut­o­fo­cus a bit faster on the Micro (Macro — Nikon calls their Macro lenses Micro just to be spe­cial) lens and I found the sharp­ness to be a hint sharper. The 105 DC lens is also razor sharp (but has no VR) and has very fast  aut­o­fo­cus, but head to head with the 105 Micro, it loses by the small­est of mar­gins to my eye. Please be aware that I only tested this lens on 2 shoots in cold­ish Mon­treal weather which unfor­tu­nately lim­ited my play.

How does it work?

The instruc­tion leaflet that comes with the lens is near use­less. You’ll want to play with this sucker for a while. But basi­cally, to get good bokeh effects you need a large aper­ture so you’ll choose an aper­ture like f/2.0, f/2.8, f/4, or f/5.6. Once you set that aper­ture, you’ll focus on your sub­ject. Then you’ll decide if you want to defo­cus what’s in front of the sub­ject, what’s behind the sub­ject, or not defo­cus at all. The defo­cus­ing sim­ply soft­ens the back­ground or fore­ground more than it would be with other lenses. The effect is sub­tle and not every­one will even notice it espe­cially novice pho­tog­ra­phers. Per­son­ally though, I love this lens and I made a mis­take when I pur­chased the f/2.8 Macro lens. I don’t do that much macro and would have got­ten more use and joy from the bokeh play offered by this lens.

From L to R - Zero defocus, defocused foreground, defocused background - Click to enlarge

From L to R — Zero defo­cus, defo­cused fore­ground, defo­cused back­ground — Click to enlarge


The images above were shot against a giant Christ­mas tree. The mid­dle image makes the fore­ground lights around the neck have an inter­est­ing glow due to the defo­cused fore­ground, but the eyes lost sharp­ness. In gen­eral I found that defo­cus­ing the fore­ground looked weird most of the time. To my eye the nor­mal set­ting and the defo­cused back­ground set­tings are the best look­ing in this set and in gen­eral. The non defo­cused images looked superb actu­ally. But a lens like this is usu­ally bought for the abil­ity to defo­cus it.

Left image had no defocus. Middle Image had background defocused to f/4 but aperture was f/2.0. The image at right was shot with the 105 Macro lens at f/2.8 its widest aperture - Click to enlarge.

Left image had no defo­cus. Mid­dle Image had back­ground defo­cused to f/4 but aper­ture was f/2.0. The image at right was shot with the 105 Macro lens at f/2.8 its widest aper­ture — Click to enlarge.


The rea­son to get the Nikon 105mm DC lens is for the (De)focus play that it offers and nor­mally you’ll set the defo­cus to the same aper­ture you are shoot­ing on. But you don’t have to fol­low that rule and when you break it, it throws the back­ground or fore­ground into an even softer or dreamier state. In the set of images above, the left image shows beau­ti­ful f/2.0 bokeh with a very sharp head­stone and no defo­cus was used. The mid­dle image was shot at f/2.0 but the rear defo­cus was set to f/4 which thinned out the zone of sharp­ness in the fore­ground in this case and soft­ened the back­ground to an even dreamier state com­pared to the pre­vi­ous shot. For com­par­i­son pur­poses the shot at right was shot with the 105 Macro lens that has no defo­cus con­trol. It still shows excel­lent sharp­ness in the head­stone and lovely bokeh in the back­ground, but it is lim­ited to f/2.8 with­out defo­cus con­trol, and so it can’t be as dreamy as the DC 105mm.


jjj

Mount Royal Ceme­tery in Mon­treal. Rear Defo­cus used on the Nikon 105mm DC — Click to enlarge


In sum­mary, if you are just start­ing out in pho­tog­ra­phy and you want an awe­some fast por­trait lens that also offers macro, the 105mm f/2.8 with VR is prob­a­bly a bet­ter choice for you and it’s 300 dol­lars cheaper.  If you just love bokeh and exper­i­men­ta­tion and are a more expe­ri­enced pho­tog­ra­pher that rarely uses Macro, you might well want to try the Nikon 105mm f2.0 DC lens.  It’s a one of a kind lens that will retain and go up in value in the future due to its unique­ness. I plan on adding it to my arse­nal in the very near future.

Two Photo Accessories Reviewed

Hi photo lovers!

I’ve tried a cou­ple of photo acces­sories recently that I’d like to share with you because they make my life easier.

1 — The S&F deluxe tech­ni­cal belt by Lowe­pro.

Lowepro S&F deluxe technical belt

Lowe­pro S&F deluxe tech­ni­cal belt

My wife picked this up for me recently as a gift and I’m lov­ing it. As men­tioned in pre­vi­ous posts and pod­casts, I’m a big fan of lens pouches and I use them almost exclu­sively (ver­sus car­ry­ing a cam­era bag) on most per­sonal photo shoots. Usu­ally I have 3 lenses on me and 2 of them are car­ried in lens pouches. Until a few weeks ago I sim­ply clipped the pouches onto an actual belt that goes through my jeans. It works well enough but get­ting into the jean pock­ets is dif­fi­cult and my wife felt I looked all dishev­elled espe­cially if I needed to wear a jacket. She was right.

I have to say, the tech­ni­cal belt is WAY bet­ter than clip­ping the pouches to a reg­u­lar pants belt. It is so much more com­fort­able and you can see the solid back sup­port if offers, it’s a pure joy to wear. Espe­cially when going from shoot­ing to the car, the whole belt comes off in a flash with the pouches firmly secured onto them. If you do need to get into your pants pock­ets you just slide the belt around. In addi­tion, it looks and feels great when you have to wear a jacket. It might well be my favourite acces­sory of 2013. It can be pur­chased imme­di­ately at B&H in the USA or at the The Cam­era Store within about 1 week.

2 - Pho­toRe­pub­lik Twin Speedlite Holder — This acces­sory was loaned to me for review by our spon­sor The Cam­era Store and I find it to be an extremely well built acces­sory. Some of the com­mon gripes peo­ple have with flash hold­ing acces­sories are their over­all ‘dink­i­ness’  and that the actual point of con­tact between the flash and the hold­ing shoe is flimsy (read risky) and dif­fi­cult to con­trol. Good new or used flashes are at least 100–600 dol­lars, why would you want to attach it to a bracket with a flimsy flash shoe holder that looks like it costs less than a nickel. One care­less bump into the light stand can snag the bot­tom part of the flash right off.

This twin flash holder is crazy solid in all respects and oper­ates smoothly. The point of attach­ment to the flash as well as the whole unit (except the knobs which are still very solid) is made of steel and oper­ates very smoothly to attach to your flash. It feels safe and that will make you feel more secure about the setup. There’s place for an umbrella holder and it tilts from front to back for eas­ier angling of light. It’s a per­fect attach­ment for shoot­ing with an umbrella when when you need more punch than one flash can offer.

PhotoRepublik Twin Speedlite Holder

Pho­toRe­pub­lik Twin Speedlite Holder — Comes with a  threaded mount­ing screw (shown in between the 2 flash hold­ing units)


123 — Entry Level Camera Trigger Showdown — PocketWizard versus Cactus

Pho­tog­ra­phy pod­cast #123 com­pares 2 entry level trig­ger­ing devices for your cam­era. A ‘trig­ger’ is sim­ply a device that allows your cam­era to fire nearly any portable flash, mono­light or stu­dio flash while it is OFF-camera. The abil­ity to fire a flash or other light source while OFF-camera allows you to mod­ify the direc­tion and the qual­ity of the light(s) to pro­duce much more cre­ative and pro­fes­sional look­ing pho­tog­ra­phy ver­sus direct on-camera flash. The 2 units tested are the Pock­etWiz­ard Plus X and the Cac­tus V5 Duo.

The PocketWizard Plus X transceiver (sold as a single unit) and the Cactus V5 Duo (2 transceivers)

The Pock­etWiz­ard Plus X trans­ceiver (sold as a sin­gle unit for $99.00) and the Cac­tus V5 Duo (2 trans­ceivers for $99.00 or sold indi­vid­i­ually at $59.00)


Thanks to The Cam­era Store (The largest cam­era store in Cal­gary, Alberta, Canada)  for spon­sor­ing the Photography.ca pod­cast and for loan­ing me the test equip­ment for this week’s podcast!

Both these units do the identical job with identical (100%) reliability in both my indoor and outdoor tests.

Both these units do the iden­ti­cal job with iden­ti­cal (100%) reli­a­bil­ity in both my indoor and out­door tests. The top photo shows how the Cac­tus trans­ceiver attaches to both the cam­era and to an off-camera flash. The bot­tom photo shows how the Pock­etWiz­ard Plus X trans­ceiver attaches to both the cam­era and to an off-camera flash. The main dif­fer­ence is that the Pock­etWiz­ard is miss­ing the extra hot shoe so it attaches to the off cam­era flash with (an included) sync-wire.


The build qual­ity of the Pock­etWiz­ard is slightly more robust than the Cac­tus V5 and its leg­endary reli­a­bil­ity (Pock­etWiz­ards have been around for decades) and the fact that they work with every other Pock­etWiz­ard ever made are its main advantages.

Where the Cactus V5 duo really shines is with the addition of the extra hot shoe on the unit. Both these units will do the identical job, but the cactus's design is more elegant and user friendly.

Where the Cac­tus V5 duo really shines is with the addi­tion of the extra hot shoe on the unit. Here the flash will act as an on axis-fill flash to fill in shad­ows cre­ated by another light, and it fits snugly into the hot shoe on top of the Cac­tus V5. At left is the Pock­etWiz­ard attempt­ing the same task but because it has no extra hot shoe it must be attached to the camera’s flash via an included sync-wire


Both these units will do the iden­ti­cal job, but the Cactus’s design (at right) is more ele­gant, eas­ier to attach and the Cac­tus V5 Duo is half the price of the Pock­etWiz­ard Plus X. Unfor­tu­nately the Cac­tus V5 will NOT work with Pock­etWiz­ards or even dif­fer­ent Cac­tus models.

Links /resources men­tioned in this podcast:

The Pock­etWiz­ard Plus X at The Cam­era Store
The Cac­tus V5 Duo at The Cam­era Store
Illu­minight — Pho­tog­ra­phy exhi­bi­tion by Marko Kulik

If you liked this pod­cast and want to review it on Itunes, this link gets you to the main page

If you are inter­ested in writ­ing for our blog please con­tact me photography.ca ( A T ) G m ail Dot co m (using stan­dard email formatting)

Please join the Photography.ca fan page on Facebook

My Face­book pro­file — Feel free to “friend” me — please just men­tion Photography.ca
My Twit­ter page — I will fol­low you if you fol­low me — Let’s con­nect — PLEASE email me and tell me who you are in case I don’t rec­i­p­ro­cate because I think you are a spammer.

If you are still lurk­ing on our forum,
feel free to join our friendly :)  Pho­tog­ra­phy forum

Thanks as well to Enrique Waizel, Bernard Dal­laire, Jason, Dar­nell B and Royce How­land who posted com­ments directly on the blog.  Although ALL com­ments are appre­ci­ated, com­ment­ing directly in this blog is pre­ferred. Thanks as well to all the new mem­bers of the bul­letin board.

If you are look­ing at this mate­r­ial on any other site except Photography.ca — Please hop on over to the Photography.ca blog and pod­cast and get this and other pho­tog­ra­phy info directly from the source. |Sub­scribe with iTunes|Sub­scribe via RSS feed |Sub­scribe for free to the Pho­tog­ra­phy pod­cast — Photography.ca and get all the posts/podcasts by Email

You can down­load this pho­tog­ra­phy pod­cast directly by click­ing the pre­ced­ing link or lis­ten to it almost imme­di­ately with the embed­ded player below.

Thanks for lis­ten­ing and keep on shooting!

115 — Color spaces — monitor settings — recommended hardware — Interview with Joe Brady

Pho­tog­ra­phy pod­cast #115 fea­tures an inter­view with Colour expert Joe Brady who works for Mac­group US.
Joe knows pretty much every­thing there is to know about get­ting accu­rate colour from your mon­i­tor and your printer. Joe has recorded 2 pod­casts with us already about mon­i­tor cal­i­bra­tion and those links are listed below in the shownotes. In this pod­cast, we tackle some colour con­cepts that are a source of con­fu­sion for many peo­ple. We talk about mon­i­tor set­tings like colour tem­per­a­ture, gamma, and lumi­nance. Then we tackle the sRGB, Adobe RGB and Prophoto RGB colour spaces and explain what they are, the advan­tages of each and when and where they are most use­ful. Finally, Joe rec­om­mends some cal­i­bra­tion tools, mon­i­tors and printers.

Scroll to the BOTTOM of this post to find the player to imme­di­ately lis­ten to the audio podcast.

Color spaces in photography

This image shows off the 3 main color spaces. You’ll note that the ProPhoto RGB color space con­tains the most col­ors. This makes it the best color space for print­ing your own images on a qual­ity printer. When post­ing to the web, the colour space should be sRGB as that is the type of mon­i­tor that most peo­ple have.

Links /resources men­tioned in this pod­cast:
Pod­cast 62 – Mon­i­tor – printer cal­i­bra­tion – Inter­view with Joe Brady
Pod­cast 63 – Review of the Col­or­munki and the i1XTreme
Joe Brady Pho­tog­ra­phy
X-Rite Col­or­Munki Photo Color Man­age­ment Solu­tion at B&H
X-Rite Col­or­Munki Dis­play at B&H
Eizo FlexS­can SX2262W at B&H
Eizo Col­orEdge CG223W 22 at B&H

If you liked this pod­cast and want to review it on Itunes, this link gets you to the main page

If you are inter­ested in writ­ing for our blog please con­tact me photography.ca (   A   T  ) G m ail  Dot co m (using stan­dard email formatting)

Please join the Photography.ca fan page on Facebook

My Face­book pro­file — Feel free to “friend” me — please just men­tion Photography.ca
My Twit­ter page — I will fol­low you if you fol­low me — Let’s con­nect — PLEASE email me and tell me who you are in case I don’t rec­i­p­ro­cate because I think you are a spammer.

If you are still lurk­ing on our forum,
feel free to join our friendly :)  Pho­tog­ra­phy forum

Thanks to Mikey88  who posted a blog com­ment about our last pod­cast. Thanks as well to every­one that sent com­ments by email about our last pod­cast. Although ALL com­ments are appre­ci­ated, com­ment­ing directly in this blog is pre­ferred. Thanks as well to all the new mem­bers of the bul­letin board. Most of the links to actual the prod­ucts are affil­i­ate links that help sup­port this site. Thanks in advance if you pur­chase through those links.

If you are look­ing at this mate­r­ial on any other site except Photography.ca — Please hop on over to the Photography.ca blog and pod­cast and get this and other pho­tog­ra­phy info directly from the source. |Sub­scribe with iTunes|Sub­scribe via RSS feed |Sub­scribe with Google Reader|Sub­scribe for free to the Pho­tog­ra­phy pod­cast — Photography.ca and get all the posts/podcasts by Email
You can down­load this pho­tog­ra­phy pod­cast directly by click­ing the pre­ced­ing link or lis­ten to it almost imme­di­ately with the embed­ded player below.

Thanks for lis­ten­ing and keep on shooting!

Essential and Advanced Filters for Creative and Outdoor Photography — E-book Review

A few months ago Dar­win Wiggett and Saman­tha Crysan­thou Pub­lished an e-book called Essen­tial and Advanced Fil­ters for Cre­ative and Out­door Pho­tog­ra­phy.  You may think that with dig­i­tal pho­tog­ra­phy the need for fil­ters is over and you would be mis­taken in think­ing this.

Cer­tain fil­ters like the polar­iz­ing fil­ter are essen­tial and at the time of this writ­ing, the effect of this fil­ter (which stays on my lens 95% of the time that I shoot out­doors in the day) is best achieved with an actual fil­ter on the lens. Although I have seen digital-effect polar­iz­ing fil­ters that you apply when post-processing an image, they suck when com­pared to the real thing. Dar­win and Saman­tha pro­vide awe­somely clear images and expla­na­tions as to why this fil­ter is essen­tial, how and when to use it cre­atively and when not to use it. This fil­ter is so impor­tant that a good 20% of the book is devoted to it. This sec­tion alone is worth the 10 dol­lars that they are charg­ing for the e-book.

Two other kinds of essen­tial fil­ters that Dar­win and Saman­tha talk about a great deal are grad­u­ated neu­tral den­sity fil­ters and neu­tral den­sity fil­ters. The pur­pose of grad­u­ated neu­tral den­sity fil­ters is to reduce the con­trast in a scene (like a clipped sky) because when a scene is too con­trasty the cam­era can not record all the tones even though our eye may see them. The fil­ters are nor­mally made of glass or plas­tic and are usu­ally shaded at one end and clear at the other end. Neu­tral den­sity fil­ters are solid coloured and are mainly used to make shut­ter speeds longer to achieve cre­ative blur­ring effects. This sec­tion of the book also has awe­some (fil­tered and non-filtered for com­par­i­son) images and crys­tal clear expla­na­tions on how to use these filters.

The final sec­tion of the book is ded­i­cated to addi­tional fil­ters that can add pop to your images as well as talk­ing about tech­ni­cal con­sid­er­a­tions like colour casts and noise reduction.

This e-book is fab and well worth the ten dol­lars. The only thing I might debate in this book is call­ing the neu­tral grad fil­ters essen­tial. I feel they are essen­tial only in cer­tain very impor­tant  cases. They are essen­tial if you want to spend less time in front of your com­puter post-processing your images, because your images will already have the con­trast con­trol built into the expo­sure. If you are already excel­lent at the HDR tech­nique, (tak­ing mul­ti­ple frames of the iden­ti­cal image with dif­fer­ent expo­sures and then blend­ing them in soft­ware) then these fil­ters are not essen­tial because you can achieve a sim­i­lar goal using HDR. That said, even if you know the HDR tech­nique well, grad­u­ated neu­tral den­sity fil­ters are still use­ful (per­haps even essen­tial) when the scene is con­trasty and involves movement.

It may come as no sur­prise that I highly rec­om­mend this 65 page e-book. Dar­win and Saman­tha are vet­eran pho­tog­ra­phers and teach­ers, write super-clearly and their pics really illus­trate the cre­ative effect these fil­ters have. This is an easy read with an easy on the eyes design. It’s a great e-book to have with you on your smart­phone or tablet for cre­ative inspi­ra­tion while in the field. It’s also a fab resource when you are think­ing about which of these fil­ters to buy.

This book can be pur­chased directly from Dar­win and Sam’s site. 

88 — Rain photography

Pho­tog­ra­phy pod­cast #88 talks about rain pho­tog­ra­phy and is based on a sug­ges­tion by Mad Aussie, Thanks MA. ‚ In the pod­cast we talk about how to go about‚ pro­tect­ing your­self and your cam­era so that you can enjoy rain pho­tog­ra­phy. We also talk about sub­ject mat­ter, tech­nique, after the rain cam­era care and we touch on light­ing as well.

Puddle and Reflection by Marko Kulik

Puddle-drop and Reflec­tion by Marko Kulik

Rainsleeve and Flash rainsleeve

Rainsleeve and Flash rainsleeve

Links /resources men­tioned in this podcast:

Rainsleeve for your DSLR and flash (at B&H)
Rainsleeve for your DSLR (at B&H)

Please join the Photography.ca fan page on Facebook

If you liked this pod­cast and want to review it on Itunes, this link gets you to the main page

My Face­book pro­file — Feel free to “friend” me — please just men­tion Photography.ca
My Twit­ter page — I will fol­low you if you fol­low me — Let’s con­nect — PLEASE email me and tell me who you are in case I don’t rec­i­p­ro­cate because I think you are a spammer.

If you are still lurk­ing on our forum,
feel free to join our friendly :) ¯¿½Pho­tog­ra­phy forum

Thanks to Yise­haq, Jack Label,‚ Robertv and Glenn Euloth who posted a blog com­ment about our last pod­cast. Thanks as always to every­one that sent com­ments by email about our last pod­cast. Although ALL com­ments are appre­ci­ated, com­ment­ing directly in this blog is pre­ferred. Thanks as well to all the new mem­bers of the bul­letin board. Most of the links to actual the prod­ucts are affil­i­ate links that help sup­port this site. Thanks in advance if you pur­chase through those links.

If you are look­ing at this mate­r­ial on any other site except Photography.ca — Please hop on over to the¯¿½ Photography.ca blog and pod­cast and get this and other pho­tog­ra­phy info directly from the source. |¯¿½Sub­scribe with iTunes |¯¿½Sub­scribe via RSS feed |¯¿½Sub­scribe with Google Reader |Sub­scribe for free to the Pho­tog­ra­phy pod­cast — Photography.ca and get all the posts/podcasts by Email
You can down­load this pho­tog­ra­phy pod­cast directly by click­ing the pre­ced­ing link or lis­ten to it almost imme­di­ately with the embed­ded player below.

86 — Inkjet paper review 2 – Museo Silver rag, Portfolio rag – Moab entrada bright

Pho­tog­ra­phy pod­cast #86 is the sec­ond? pod­cast devoted to high end inkjet papers and it reviews and dis­cusses 3 of them. I LOVE photo papers (tra­di­tional and dig­i­tal) and I just bought a new Epson 3880 inkjet to test inkjet papers with?.and of course make larger prints.?There?s LOADS of cre­ative pos­si­bil­i­ties when you try new inkjet papers so I hope the review of these 3 papers?is use­ful to many listeners/readers.

All 3 of these papers are highly rec­om­mended. Museo Sil­ver rag is a thick (300 GSM) light cream coloured paper with a medium gloss fin­ish and a slight tex­ture. Museo Port­fo­lio rag is a thick (300GSM) matte paper with a cream colour and very slight tex­ture. Moab Entrada 300 bright is a thick (300GSM) dou­ble sided matte paper with a white colour and slight tex­ture. Just as an FYI, if i say a paper has a cream colour, oth­ers may say on first glance, no it’s white. How­ever, take that paper and put it beside some­thing like reg­u­lar plain white laser paper and the creamy base tone is more apparent.

Note as well that the 2 matte papers have opti­cal bright­en­ers in them. I also talk about ICC pro­files again. Here is where they go on your com­puter after you down­load them. MAC= MAC HD > Library > Col­or­Sync > Pro­files
Win­dows PC= C: > Win­dows > Sys­tem 32 > Spool > Dri­vers > Color

Detail from Parisian self por­trait on Museo sil­ver rag — ?Marko Kulik

Parisian self por­trait on Museo sil­ver rag — ?Marko Kulik

Detail from Reflec­tion at Dor­win — 2009 on Museo port­fo­lio rag — ?Marko Kulik

Reflec­tion at Dor­win — 2009 on Museo port­fo­lio rag — ?Marko Kulik

Detail from Parisian self por­trait on Museo port­fo­lio rag — ?Marko Kulik

Parisian self por­trait on Museo port­fo­lio rag — ?Marko Kulik

Links /resources men­tioned in this podcast:

Epson 3880 at B&H
Pod­cast 62 — Monitor/printer cal­i­bra­tion
Pod­cast 63 — I1 Extreme and Colour­Munki review & printer dia­logue boxes when print­ing.
Museo Sil­ver ragBuy Museo sil­ver rag at B&H
Museo Port­fo­lio ragBuy Museo port­fo­lio rag at B&H
Moab Entrada 300 bright- Buy Moab entrada bright 300 at B&H
Main assign­ment on our pho­tog­ra­phy forum — Min­i­mal­ism
Level 2 assign­ment on our? pho­tog­ra­phy forum — Side­light to cre­ate tex­ture in B/W

Publicphotograpgy.orgCel­e­brat­ing the rights of pho­tog­ra­phers -?Publicphotography.org — Flickr groupPublicphotography.org — Face­book group

Please join the Photography.ca fan page on Facebook

If you liked this pod­cast and want to review it on Itunes, this link gets you to the main page

My Face­book pro­file — Feel free to “friend” me — please just men­tion Photography.ca
My Twit­ter page — I will fol­low you if you fol­low me — Let’s con­nect — PLEASE email me and tell me who you are in case I don’t rec­i­p­ro­cate because I think you are a spammer.

If you are still lurk­ing on our forum,
feel free to join our friendly :) ?Pho­tog­ra­phy forum

Thanks to Benny who posted a blog com­ment about our last pod­cast. Thanks as always to every­one that sent com­ments by email about our last pod­cast. Although ALL com­ments are appre­ci­ated, com­ment­ing directly in this blog is pre­ferred. Thanks as well to all the new mem­bers of the bul­letin board. Most of the links to actual the prod­ucts are affil­i­ate links that help sup­port this site. Thanks in advance if you pur­chase through those links.

If you are look­ing at this mate­r­ial on any other site except Photography.ca — Please hop on over to the?Photography.ca blog and pod­cast and get this and other pho­tog­ra­phy info directly from the source. I?Sub­scribe with iTunes I?Sub­scribe via RSS feed I?Sub­scribe with Google Reader ISub­scribe for free to the Pho­tog­ra­phy pod­cast — Photography.ca and get all the posts/podcasts by Email
You can down­load this pho­tog­ra­phy pod­cast directly by click­ing the pre­ced­ing link or lis­ten to it almost imme­di­ately with the embed­ded player below.